PDFMAILER PlugIn
PDFMAILER PlugIn - Manual
- Description and Introduction
- Principle and integration examples
- Control mailing and letter mail with tax stamps
- Prerequisite
- Delivery State and Setup
- Binding to the Printer Instance
- Print Job Status
- Tab "MAPI - Profiles..." - Setup and Test of the MAPI Interface
- Tab "SMTP - Profiles" - Setup and Test of SMTP Servers
- Setting up (s)FTP connections in the TAB "SFTP-Profiles..."
- Your dispatches in your company CI - the tab "PDF Backgrounds"
- Monitoring
- Last but not least - the tab "Registration and Infos..."
- Registration of the license key in the application
- Automatic license distribution with the 7-PDF Mailer PlugIn full version
- Automatic deployment / software distribution
Control Characters - Documentation
Description and Introduction
The 7-PDF Mailer Plugin extends the functionality of your 7-PDF Printer by enabling the integration of external commands (control codes; embedded commands) for print control.
After coupling the plug-in with any 7-PDF Printer instance, the user can enter these control codes via print jobs. The codes can be embedded directly into the print texts or into print forms that come from systems such as ERP, CRM or WaWi. With a few simple control codes, it is possible, for example, to send personalized print jobs from your ERP directly to your customers via email, including customized email texts (also from text files), additional email attachments and dynamically embeddable digital PDF stationery. You can also freely determine the storage path and file name of the PDF document to be printed, and much more. A comprehensive overview of all available control codes such as @@to will be described below.
Principle and integration examples
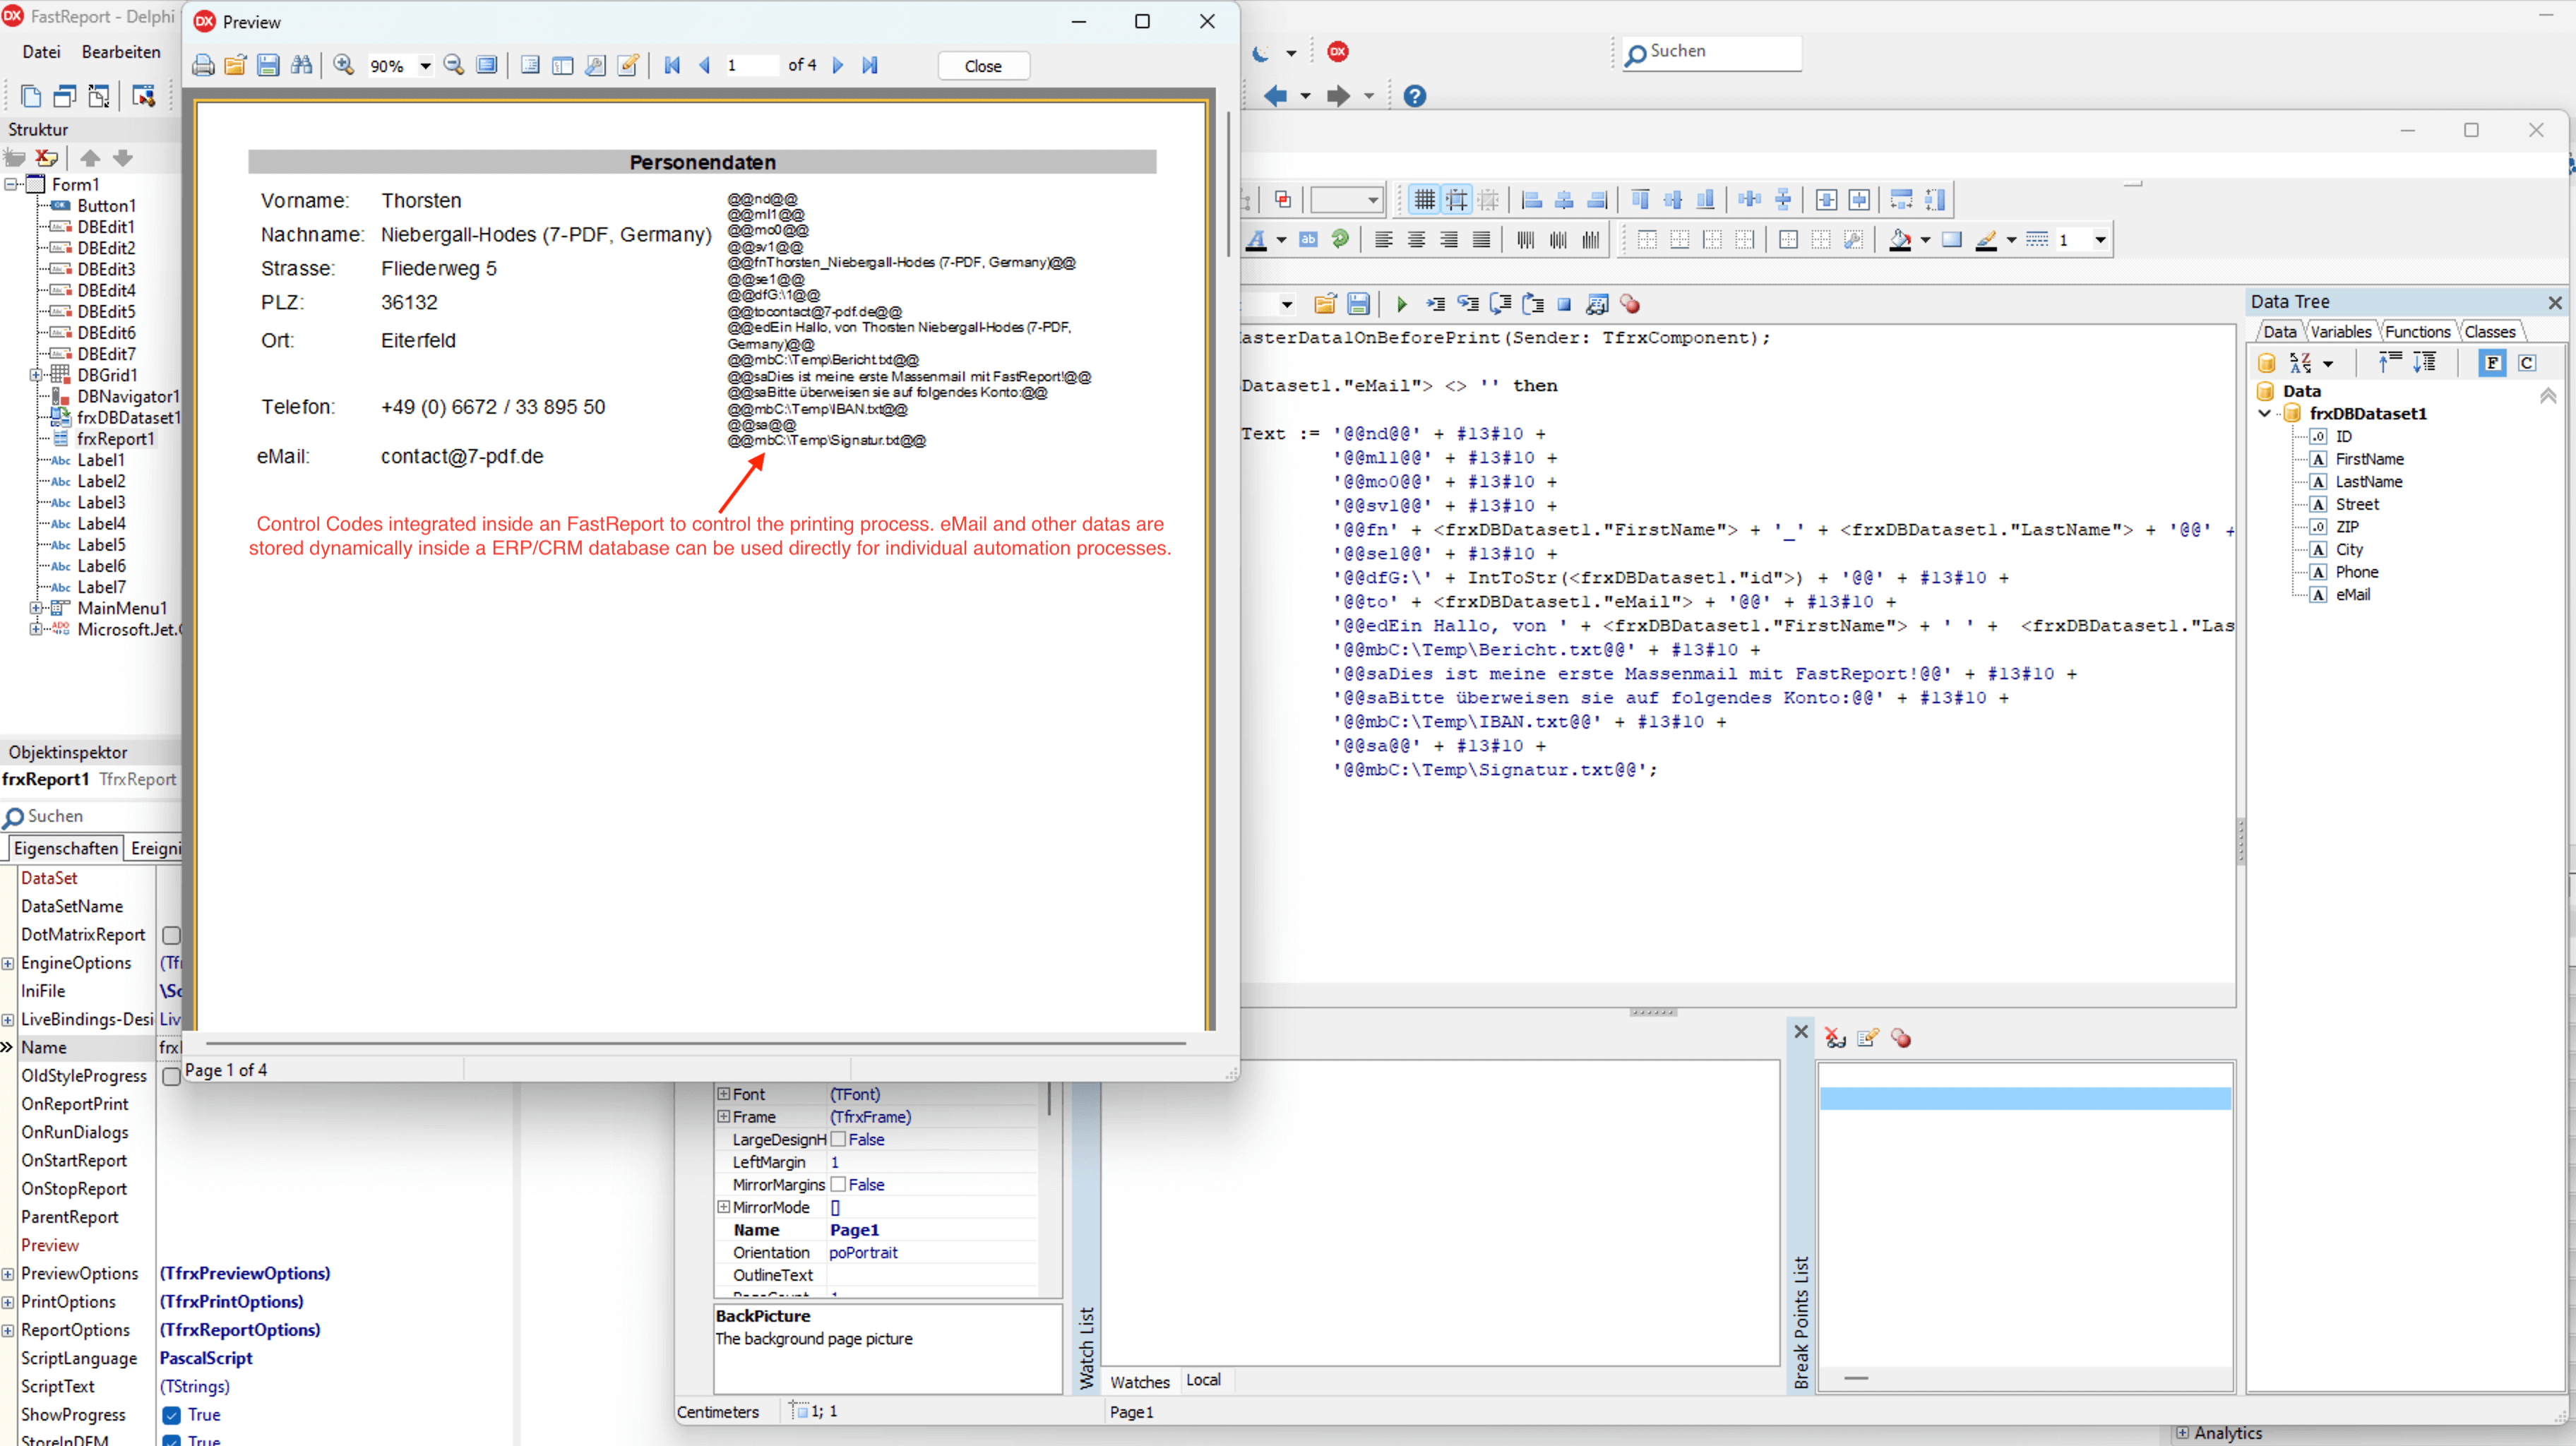
The following figure shows the principle using a FastReport under Delphi as an example. All other reporting tools such as Crystal Report, form editors such as SAP Smart Forms etc., to name just a few, are also possible. Even with a Microsoft Word mail merge document and a data source for the data records, fully automated mailings could be implemented effectively and easily using the 7-PDF Mailer PlugIn.
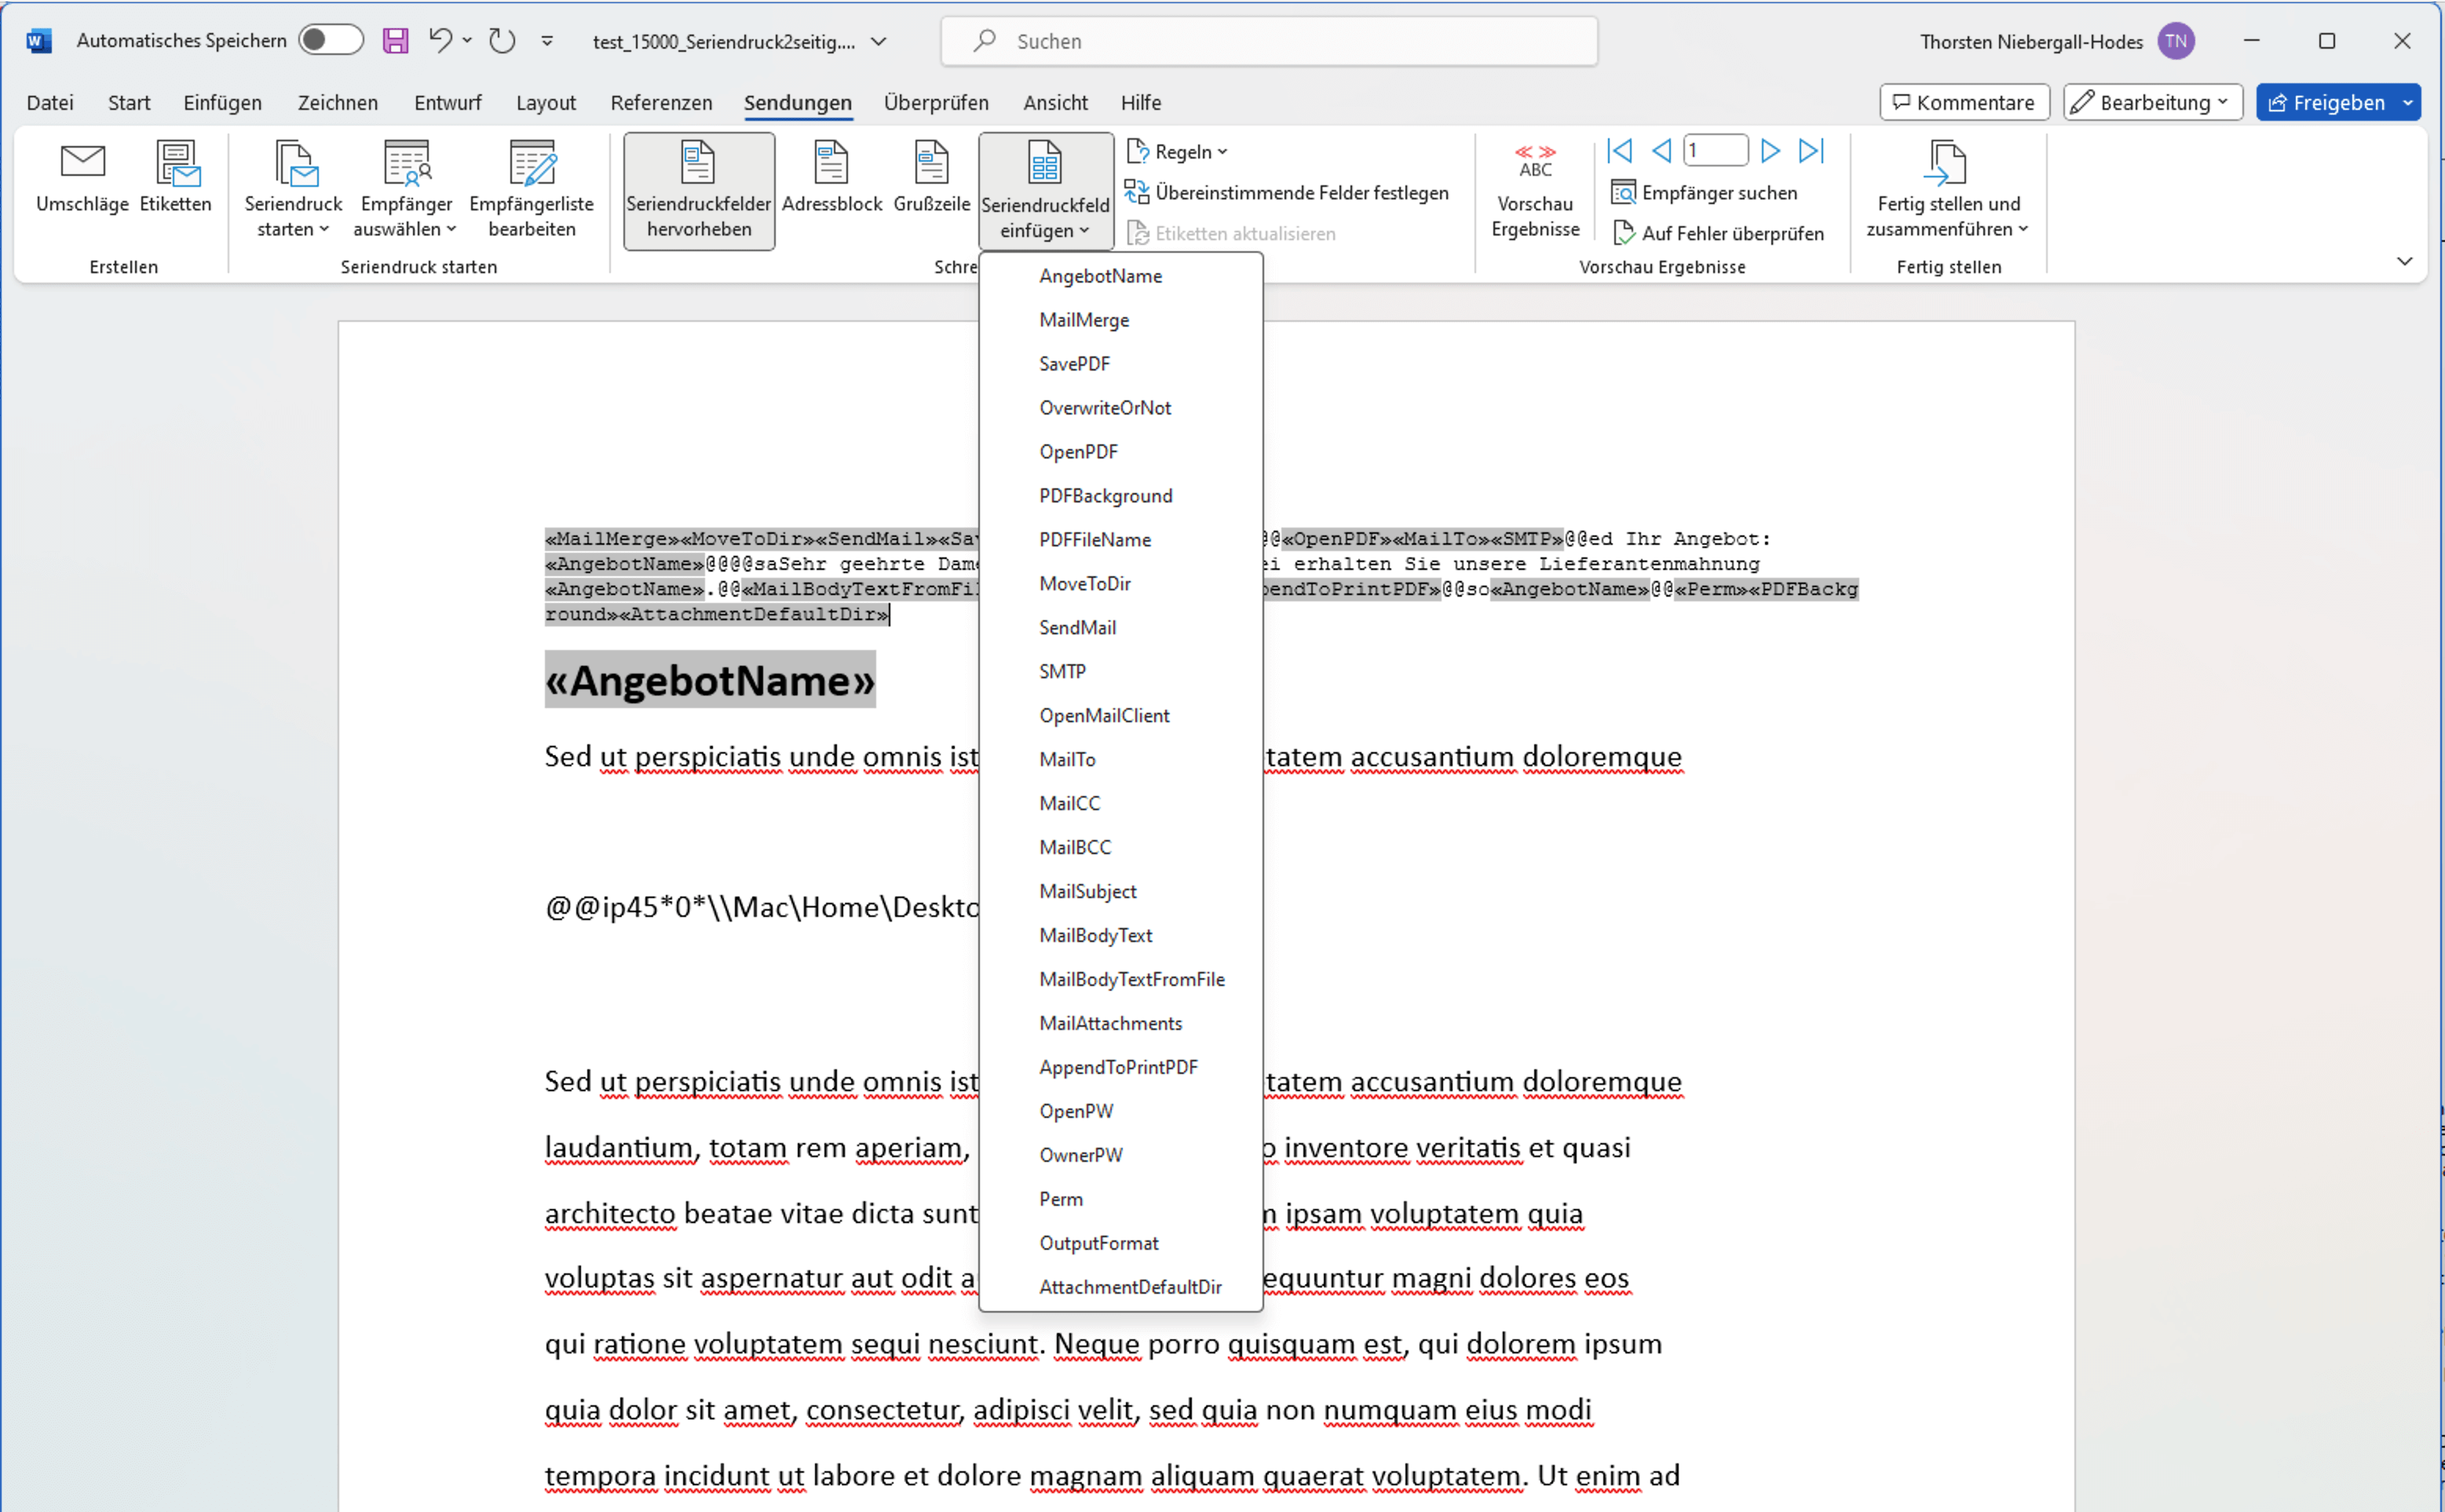
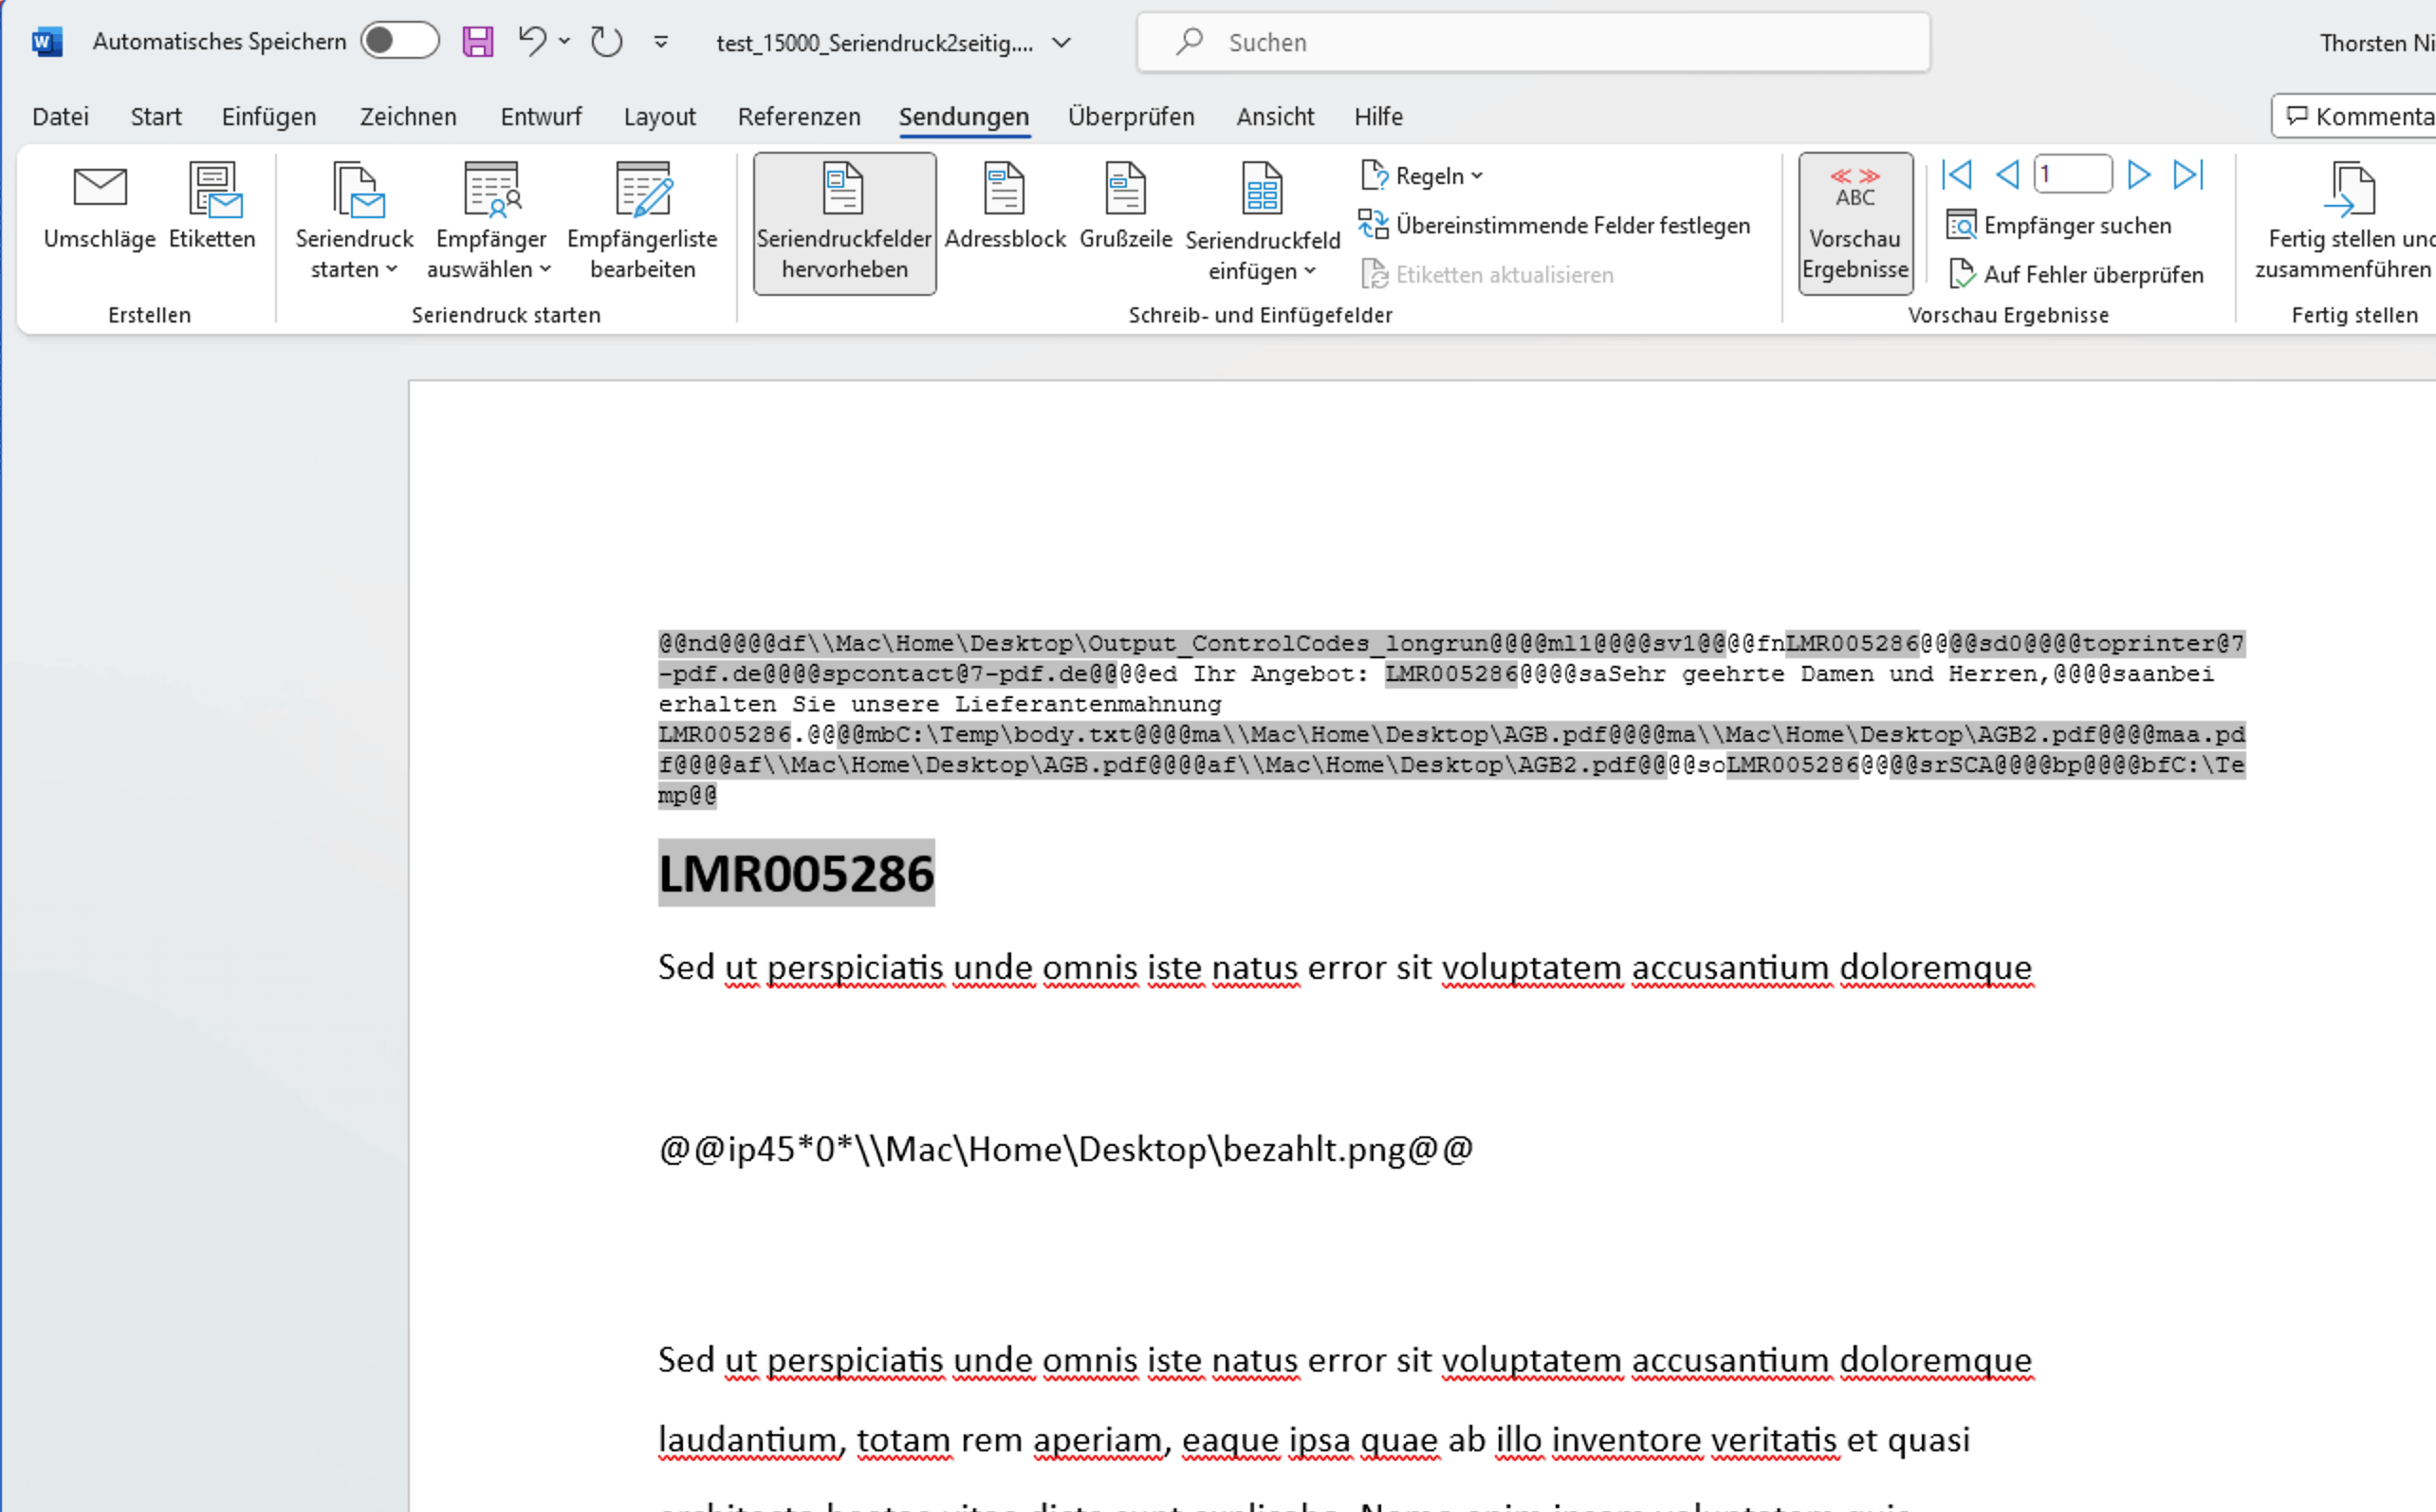
An example mailing via Microsoft Word. The integration of mail merge fields with control characters and the mail merge to be started afterwards via the 7-PDF Mailer PlugIn makes individualized mass mailing via email flexible and highly efficient and easy!
With the control character @@ip, a graphic is dynamically integrated at this point in the document... (for example, an "already paid" image...or a dynamically generated QRCODE graphic, etc.
Small example at the end! Control code combination for "intelligent" storage
Although this plug-in is called PDFMAILER, it can also be used exclusively for intelligent, automatic storage of PDF documents. Let's imagine an Excel invoice, where the requirement is no email sending, only dedicated storage under specific file names (e.g., an invoice number) and storage paths. Additionally, a "paid" graphic should be placed inside the PDF. Here is a simple control code combination that solves this immediately:
    @@ml0@@

    @@mo0@@

    @@sv1@@

    @@fnInvoiceNo-2025-02-234456.pdf@@

    @@dfC:\Temp\@@

    @@ip30*30*45*0*C:\Temp\paid.png@@
In detail, ml0 = no email sending; mo0 = do not open email client; sv1 = enable saving; fn = filename (InvoiceNo-2025-02-234456.pdf); df = path to storage directory; ip = Insert Picture at X = 30mm, Y=30mm, 30mm wide, 45mm high, path to image
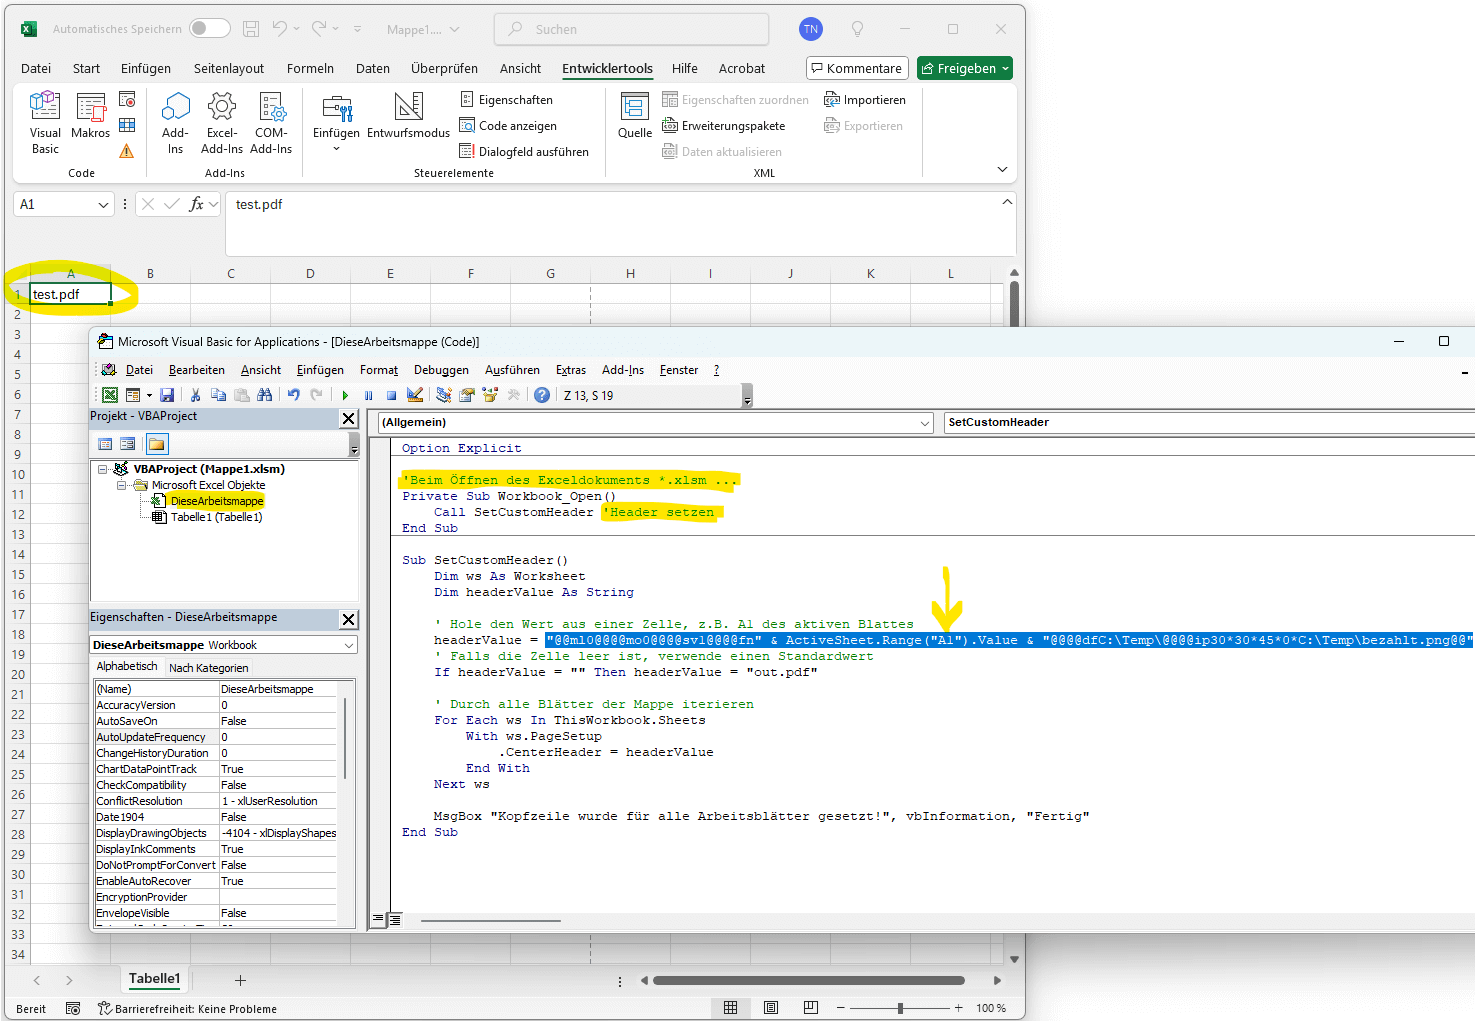
We implemented this control code combination for a customer inside a custom Excel header. The values, such as the filename from cell "A1," were dynamically filled from cell values. The same principle can be applied using mail merge fields in Word or any report generator in an ERP/WMS system to automate everything. Quite an elegant solution to work with control codes, don't you think?
Here is the VBA code for copying:
Option Explicit
'When opening the Excel document *.xlsm ...
Private Sub Workbook_Open()
    Call SetCustomHeader 'Set header
End Sub

Sub SetCustomHeader()
    Dim ws As Worksheet
    Dim headerValue As String

    ' Get value from a cell, e.g., A1 of the active sheet
    headerValue = "@@ml0@@@@mo0@@@@sv1@@@@fn" & ActiveSheet.Range("A1").Value & "@@@@dfC:\Temp\@@@@ip30*30*45*0*C:\Temp\paid.png@@"
    ' If the cell is empty, use a default value
    If headerValue = "" Then headerValue = "out.pdf"

    ' Iterate through all sheets in the workbook
    For Each ws In ThisWorkbook.Sheets
        With ws.PageSetup
            .CenterHeader = headerValue
        End With
    Next ws

    MsgBox "Header has been set for all worksheets!", vbInformation, "Done"
End Sub
Control mailing and letter mail with tax stamps
Using the control character @@pf you can control that mailings are also forwarded to another printer in parallel with the mailing. This feature makes it possible to send your mailings to an electronic mail sender such as easyNova and others. You could basically use your data from ERP, CRM, etc. to control when a physical letter is sent to a customer. For this purpose, the service provider installs another virtual printer, which can be used to send a physical letter to the postal sender.
Prerequisite
The PDF Mailer PlugIn works directly with our 7-PDF Printer. This requires a corresponding installation of the PDF printer. So you should first install the PDF printer, then the plug-in. After connecting the plug-in to the printer instance, it can only be used for processing control characters. If you don't want to do without a separate PDF printer, simply install another instance and use it for your individual PDF creation.
We recommend using the font Courier, size at least 4pt to embed the control characters and the data they contain. Control characters must be printed in a visible area of a document that is not covered by other content elements (!) and is therefore free. We recommend placing the control characters in the header area of the document, before the actual document content is printed. A control character may not be spread over two lines by a line break. If the PDF printer AND the PDF mailer plug-in are licensed, all control characters including the included data are automatically physically deleted from the PDF content when processed by the plug-in and can no longer be found in the PDF.
Licensing requirements
To use the plug-in, in addition to the plug-in license, you need at least a licensed version of the Professional or Expert Edition of 7-PDF Printer. Without licenses, the plugin runs as a trail version. In Trail mode, generated PDF documents receive a red watermark text "PLEASE REGISTER", and the control characters are not removed. This limitation no longer applies with licensing. You can easily buy licenses online here....
Our PDFMailer is licensed using the named user license model. That is, it is a one-time license and there are no additional costs. Our PDFMailer is available without a subscription (compulsory) and for a fair one-time license fee! Just as we have guaranteed for years with our 7-PDF Printer (PDF printer). This means that you also benefit from our Lifetime License - Principle with PDFMailer.
System requirements
All Windows versions currently supported by Microsoft are supported, including all server versions from Windows Server 2016 and higher. All Outlook versions supported by Microsoft in conjunction with common SMTP servers via password authentication or MAPI.
Delivery State and Setup
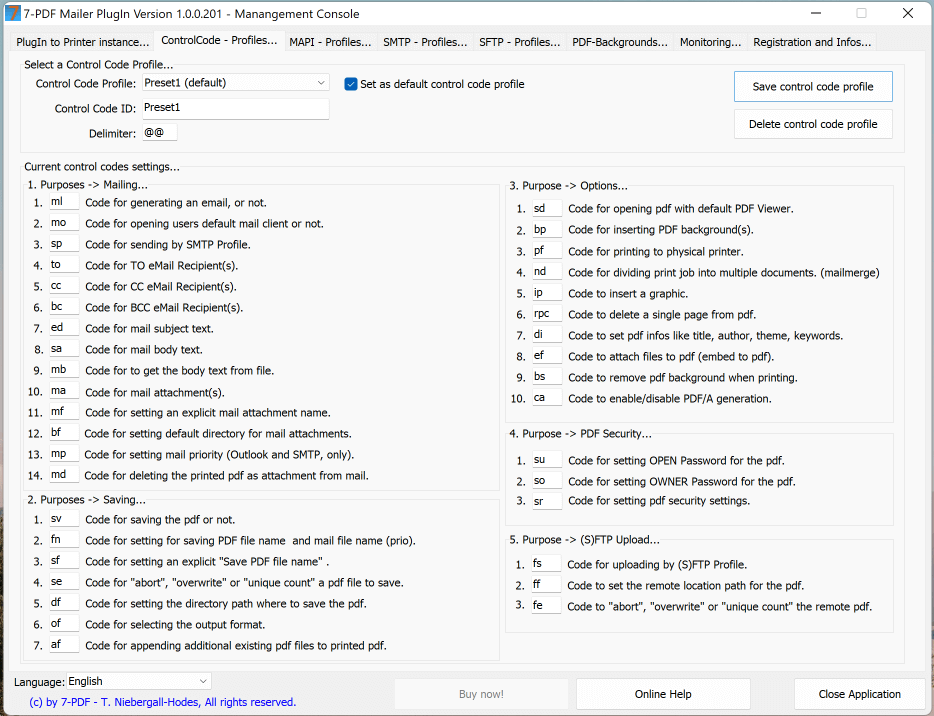
In the delivery state, the installation of the 7-PDF Mailer Plugin includes two so-called control code profiles. "Preset1" works with the delimiter @@ and two-letter control characters, whereas "Preset2" uses ## as a delimiter and mostly three-letter control characters. The presets in the delivery state can be renamed but not deleted. Depending on the business context, it may be advantageous to use one preset over the other.
You can also define and store your control code profiles at any time. One of these control code profiles must be set as the default profile. In the delivery state, this is Preset1 with @@ as the delimiter, which we also want to use as a template for the documentation of the individual control codes on this page.
Binding to the Printer Instance
As already described, the 7-PDF Mailer Plugin is a software extension for 7-PDF Printer. Therefore, a functioning 7-PDF Printer installation on your system is a prerequisite for using the plugin. Optionally as a completely normal, pure standard installation (desktop installation in the Windows user context) or as a PDF network printer installation (centrally on the server with /SHARE /PRINTERNAME="PDF_MAILER"). 7-PDF Printer offers the possibility during installation to specify a printer name via installation parameters. That means you can create a new printer instance with the installation parameter /PRINTERNAME="PDF_MAILER" in addition to the normal PDF printer installation of 7-PDF Printer and couple this with the plugin. This gives you the choice of when you want to process control codes, for example, to carry out an email dispatch from your ERP or CRM, or to print a normal PDF via the printer name "7-PDF Printer".
For simplicity's sake, we couple the plugin with the locally installed printer instance "7-PDF Printer" in the next section of this documentation. This means that this instance is so to speak "occupied". I.e., orders containing control codes can be processed via this instance. Normal PDF print jobs should no longer be initiated via this, as from coupling (we also call this process binding) no print dialog is displayed for this "printer".
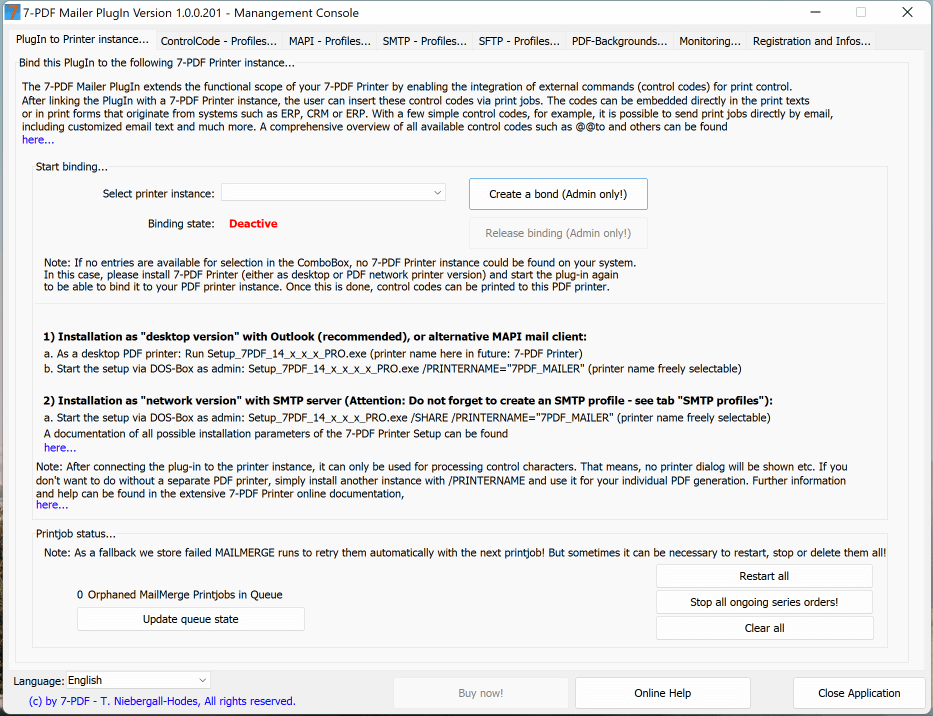
The following screenshot shows the 7-PDF Mailer Plugin immediately after installation in the tab "Plugin to Printer Instance". Via this tab, you can "couple" an installed 7-PDF Printer printer instance with the plugin.
Select the desired 7-PDF Printer instance from the ComboBox...(admin rights may be explicitly required). Here we choose "7-PDF Printer".
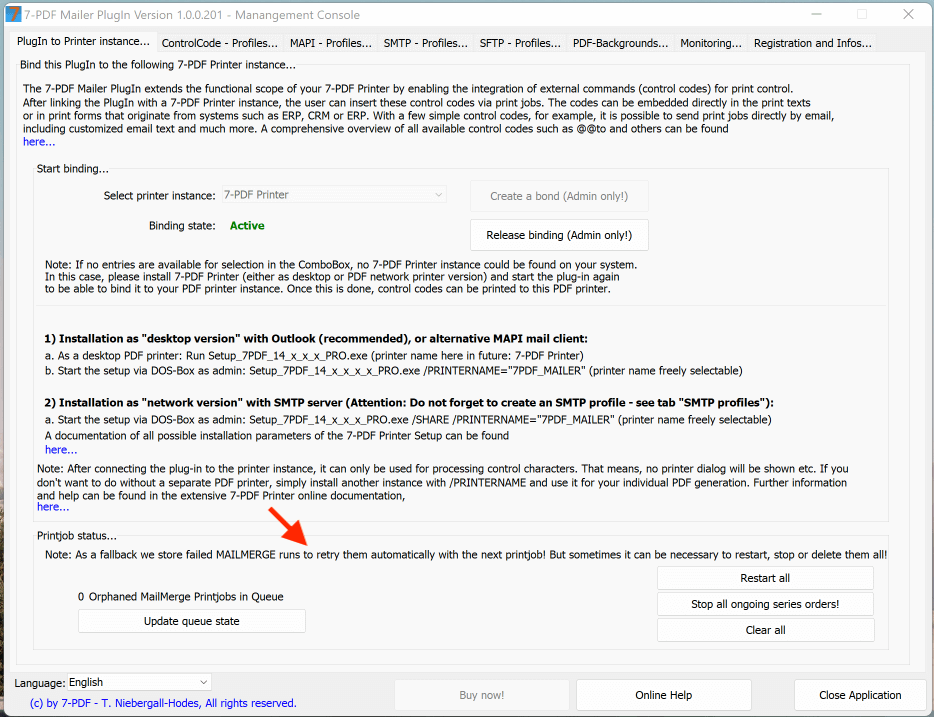
After "coupling", this is displayed as "Active". Thus, the plugin is bound to the PDF printer. From this point on, this printer instance can process control characters contained in the print data.
Important note: After binding, you should not rename the printer instance or make any other configuration changes at the printer level. This could damage the plug-in binding and require a new installation of the PDF printer and plug-in. Please remove the binding with the plug-in as shown here before doing such things! Please never simply rename the printer using Windows printer management, as the port connection will then be lost.
Only "name" or configure the PDF printer using the Setup parameters /PRINTERNAME="XY" during installation...
Print Job Status
In the lower area, you will find the print job status on this tab. It shows whether, in mass mailings (e.g., in serial letter processing), there were orphaned print jobs or not. For example, if mail dispatches were not accepted by mail servers, etc. Then these orphaned jobs can be restarted, deleted, or stopped if there is a mass mailing in progress. No job is lost, everything is logged and can be restarted if something goes wrong.
Tab "MAPI - Profiles..." - Setup and Test of the MAPI Interface
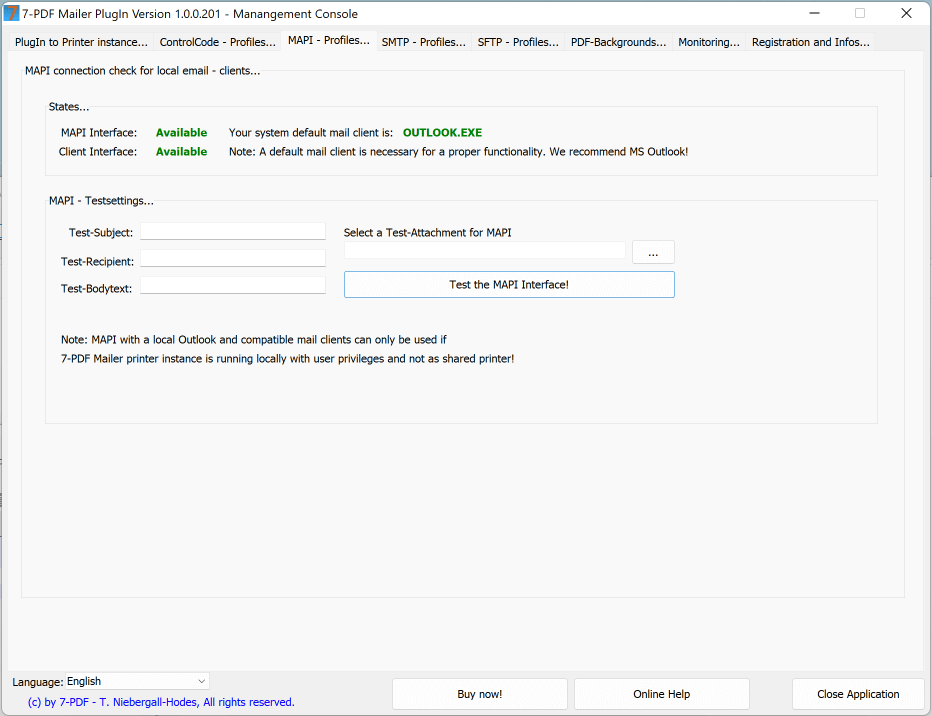
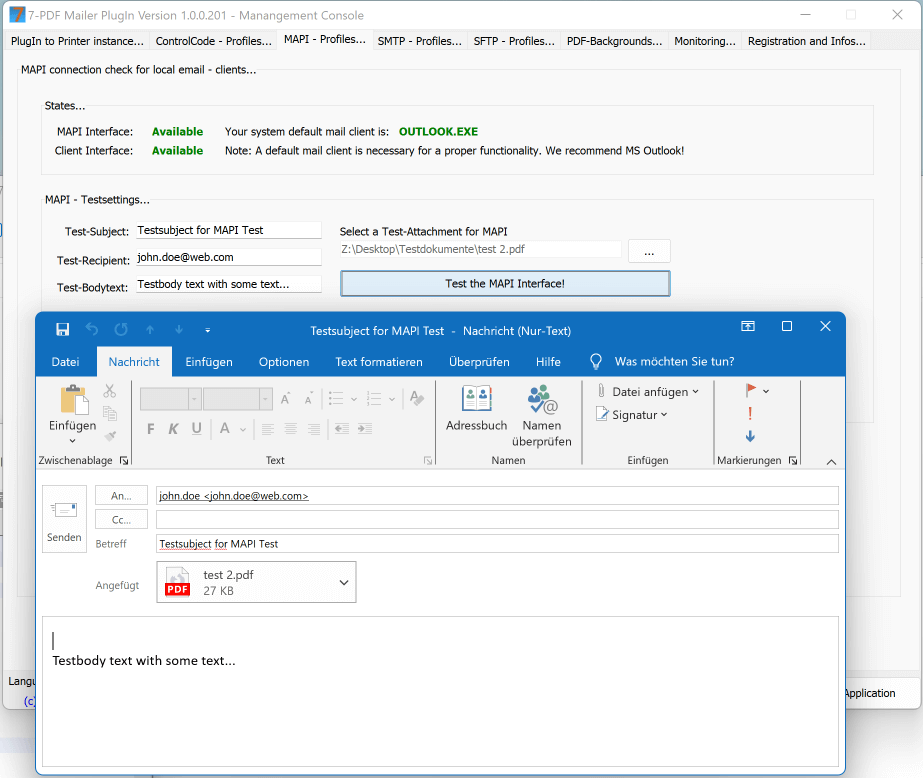
For sending emails, you can use a mail client available on your system for desktop installations, i.e., normal installations under a Windows user (not a PDF network printer). We prefer Outlook, but you can also use Mozilla Thunderbird with our plugin. The sending is done via MAPI or OLE Automation. To set up and test the MAPI interface and the current default mail client, the tab "MAPI - Profiles..." is available. You should open this tab after the "binding" of the plugin to the PDF printer. If everything fits on your system, the tab should look as shown in the following screenshot after coupling:
In the section "MAPI - Test Settings..." you can test the MAPI interface. Before you go into productive use of the plugin and use your local mail client for dispatch, a test might be a good idea. Here is a test with some fictional test data. A click on the button "Test the MAPI interface!" should then pop up a mail client window and show the test mail with the previously captured data. As shown in the screenshot here:
Tab "SMTP - Profiles" - Setup and Test of SMTP Servers
In a corporate environment, you might operate your own SMTP server such as Microsoft Exchange, PostFix under Unix/Linux, etc., and prefer to use this mail server instead of the local mail client. As a PDF network printer, this option is not just an option but a necessity, because as a PDF network printer, the user no longer interacts directly with the PDF printer, but everything runs centrally through a print server. Hence, a mail client can no longer be used, for example, for manual dispatch. The process should or must even run fully automatically and centralized. An offer dispatch with appropriately prepared reporting, which includes the control codes and data, is sent as a print job to the central print server or PDF printer, the rest is handled by the plugin regarding the dispatch of the offer to the customer. In this case, the MAPI interface or a mail client would be very hindering and perhaps not reliable enough. And exactly for this, there is the possibility to store an SMTP profile in the plugin, which can be defined via the corresponding control character in the reporting. In the context of the previously introduced control code profile "Preset1", the control character @@sp[SMTP_EMAILADDRESS]@@ would be set in the report.
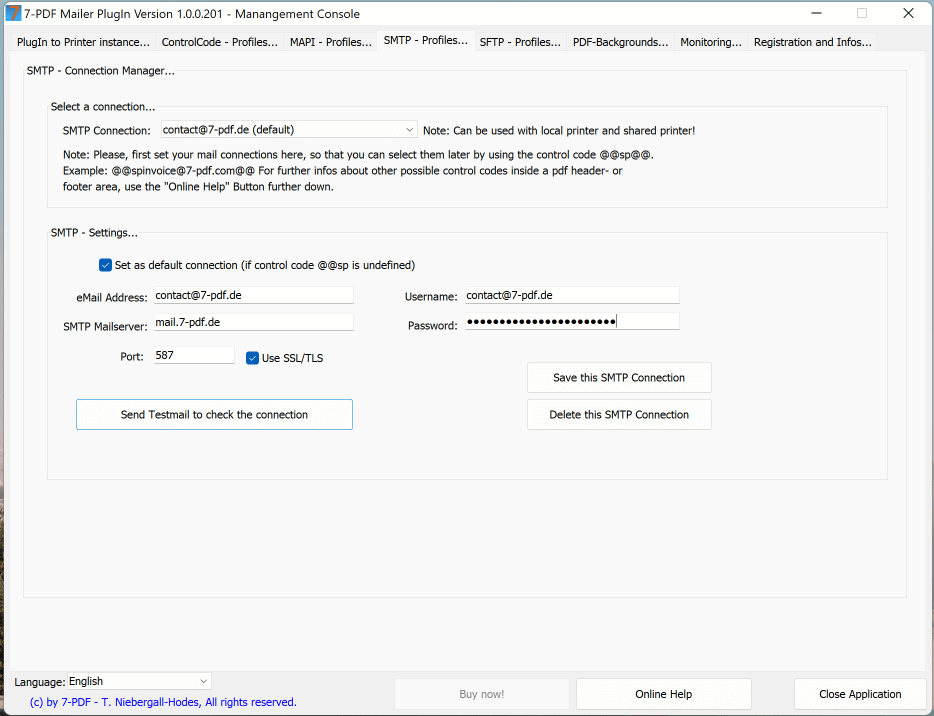
The tab "SMTP - Profiles" is depicted in the following screenshot, showing an SMTP profile that has been created... here, the code @@spcontact@7-pdf.de@@ would be set in the reporting to use exactly this SMTP connection for dispatches. The profile shown in the screenshot is the standard profile. That is, the fallback SMTP connection for dispatches, and for monitoring and status emails to the admin in mass dispatches. This SMTP connection would thus be used to inform the admin about the status, start, and end of mass dispatches via email! But more on that when we come to the description of the tab "Monitoring".
Here, a dispatch test was successfully carried out, the notification window confirms the successful sending of a test email to "contact@7-pdf.de". The connection can thus be saved. All passwords are encrypted and stored by the plugin using AES-256bit encryption (no plaintext).
Setting up (s)FTP Connections in the Tab "SFTP-Profiles..."
Through control codes, in addition to dispatching PDF documents, attachments, etc., you can also transfer the "printed" PDF document to an (s)FTP server. For this purpose, the SFTP connections to be stored beforehand in this tab can be used. The principle is similar to the use of the previously described SMTP connections. The control code here is called @@fs[SFTP_NAME]@@, if we stay in the context of the control code profile "Preset1". However, when using SFTP, the control characters @@ff and @@fe must also be used, but this is part of the control code documentation further down on this page.
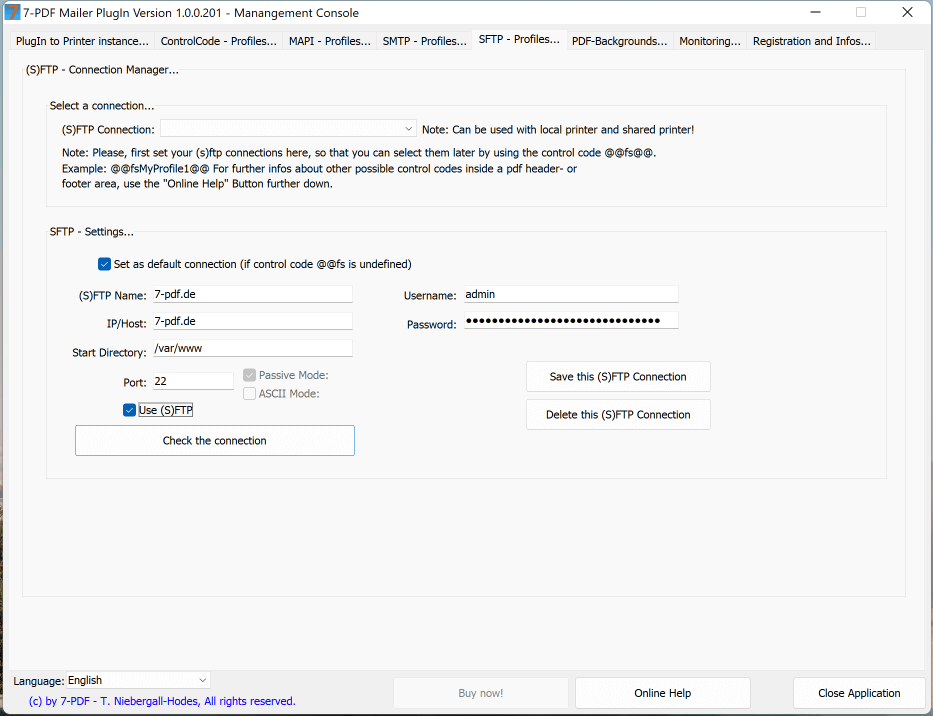
As you can see from the screenshot, it is also possible and advisable to define a connection as the default connection for SFTP connections. Especially if the data value of the relevant control code is undefined from your reporting or ERP system... Then the default or standard connection will be used as a fallback. Therefore, we always advise to set a default connection.
In this tab, you also have the option to check the connection before saving and using it. Passwords are, of course, also encrypted and stored here. Each connection can be defined as either an SFTP or a pure FTP connection.
Attention: Only use the "absolute" path to your SFTP folder!
Your Dispatches in Your Company CI - the Tab "PDF Backgrounds"
If you want to send your offer or invoice on your company letterhead - CI, then this tab is exactly what you need to be able to control this dynamically. By storing different PDF background documents (PDF letter templates) in PDF format, you can precisely define with control codes which letterhead to use on which page and for which dispatch. And this can be done within your CRM, your inventory management system, or even from a mail merge with Microsoft Word. Define one or several PDF backgrounds and give them unique names. Then use the control character @@bp[BACKGROUNDNAME]@@ to select it in your offer forms, etc., and the plugin does the rest. The integration of PDF background templates or PDF letterhead is highly flexible and compatible with the PDF printer itself. That means all "scenarios of PDF background rendering" that the 7-PDF Printer natively supports can also be used with control codes. A detailed documentation can be found on this page. You simply replace the path to the PDF background file with the "background name" of the PDF letterhead when using the plugin. Done!
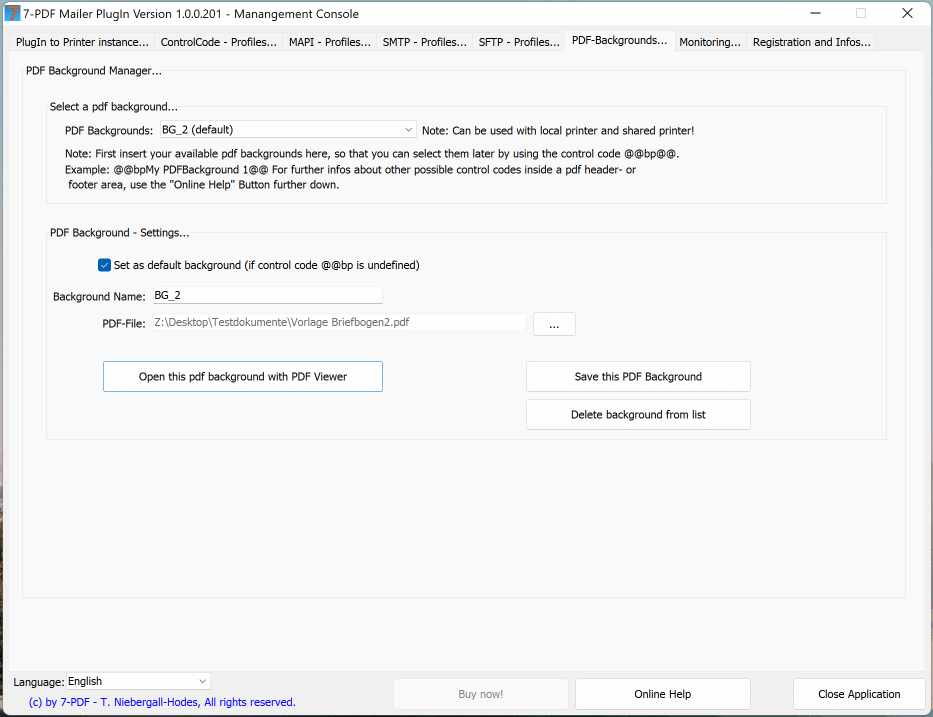
A small example: You have saved BG_2 from the screenshot above, logically BG_1 as well. Now we want to use BG_1 for the first page, and BG_2 for the following pages in all dispatches. Then we define the control character in the context of the control code profile "Preset1" as follows:
@@bpBG_1<F1>BG_2<F2->@@
This syntax is described in detail in all possible variants via the following link to "Scenarios of PDF Background Rendering". As mentioned, you no longer use an absolute file path when working with the plugin but rather your "PDF background names" or PDF background IDs... however you choose to name them. As always, a default PDF background can also be defined as a fallback!
Monitoring
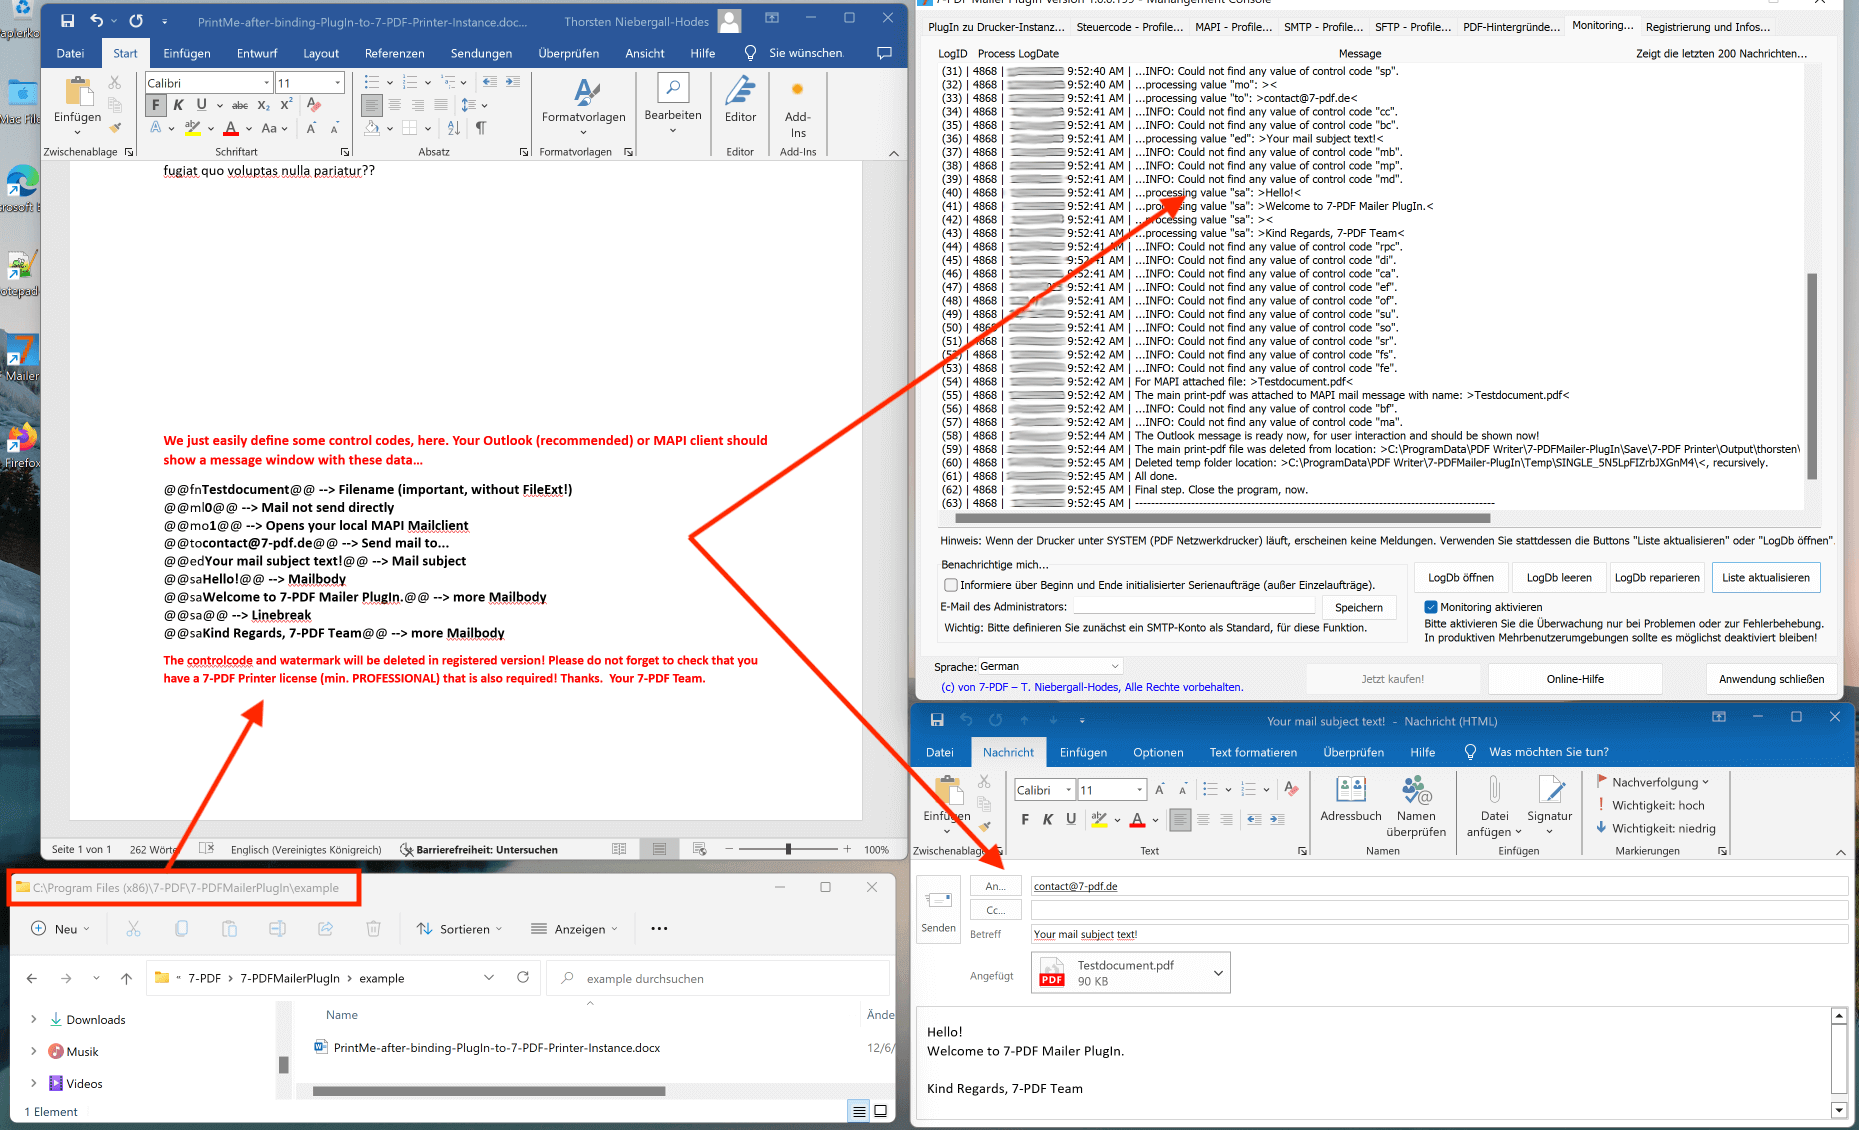
The plugin features comprehensive monitoring under the tab "Monitoring..." which you can activate as needed. However, monitoring should only be used for troubleshooting, report development, and corresponding tests. As every admin knows, monitoring affects performance. But sometimes it's simply necessary to check why something is not being sent or why the dispatch is not going as desired. In these cases, you can temporarily activate monitoring to see live what the plugin is doing and where something is failing. So, this is the right place for troubleshooting. Please note that the monitoring here targets the plugin. If the PDF creation via the PDF printer is not carried out properly, 7-PDF Printer offers its own debug mode, which is described on this page.
We have deliberately made the screenshot a bit larger than the previous ones, as there are some important things we want to describe to you at this point. The screenshot shows our example document, which is installed with the plugin setup on your system. It is located in a standard installation at C:\Program Files (x86)\7-PDF\7-PDFMailerPlugIn\example. The DOCX file contained therein can be opened and used for an initial test with the plugin. The principle of using control codes is already apparent here and is a good start for your familiarization. Of course, the whole thing becomes more complex with the addition of further control characters. You can print the example directly via Word to the 7-PDF Printer printer instance previously linked with the plugin. It then takes a few seconds, and with monitoring activated beforehand, the output should look similar to what is shown in the screenshot. Basically, you see everything that happens... or doesn't happen. If everything is installed correctly, and a local Outlook is installed on the system (recommended), then after printing, the mail window shown at the bottom right in the screenshot should appear, with all the data previously captured in the Word document and sent to the PDF printer and the plugin.
For mass dispatches, in the so-called serial print process... admins can also leave their email address here. Important: A default SMTP connection must have been stored under SMTP Profiles beforehand. If this is the case, admins will automatically receive a status email from the plugin after setting the checkbox "Inform me about the start and end of initialized serial orders..." and saving this information. An error log will also be included in these emails should there be any errors.
Last but not least - the Tab "Registration and Infos..."
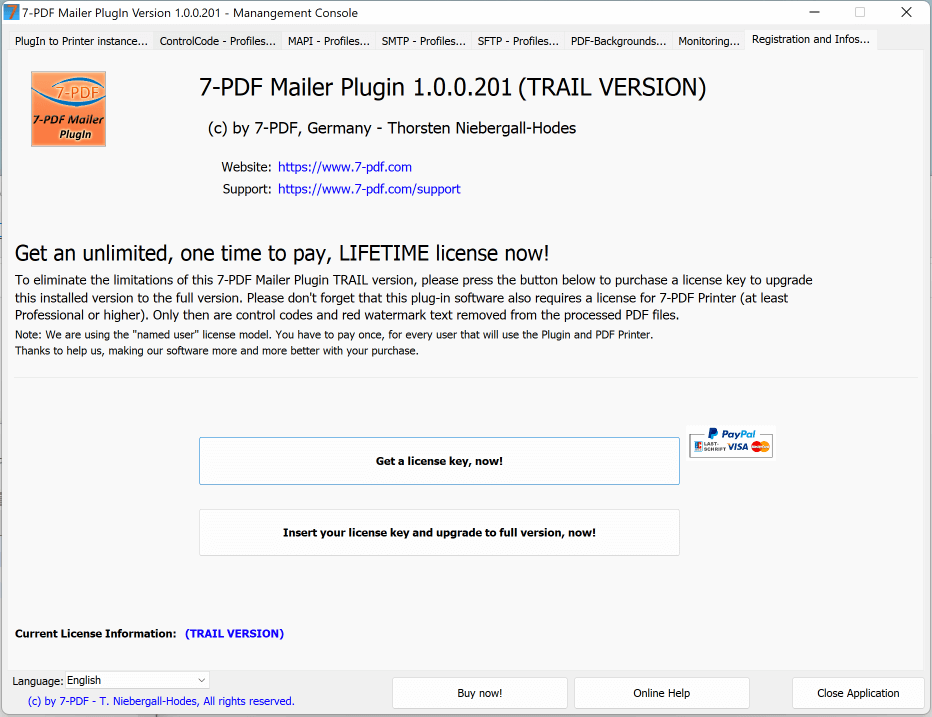
With the plugin in combination with our 7-PDF Printer, you can dynamically and controlledly print and digitally process your documents. You can store documents at desired locations, set a desired filename for the PDF print beforehand, then send the PDF document via email to the customer, forward it to a physical printer, and simultaneously do an SFTP upload. Everything is fully controlled and automatable from inventory management, ERP, and CRM systems. You can realize mass mailings, mail merge dispatches via Word, and digitalize your processes.
However, sooner or later you will need a license for both the 7-PDF Printer and the plugin. Without a license, you can technically test the entire plugin, but you will receive a watermark text in the generated PDFs and the control characters will be left in the document. This is not disturbing for tests, so you can test everything before purchasing a license... but a license purchase is necessary at some point.
Both software products are separate applications that are licensed with us according to the Named User Principle. A user may only need the 7-PDF Printer and not the plugin, but later they might want to work with control characters. Then they buy the license for the plugin in addition to their PDF Printer license. We have deliberately not tightly integrated these two products because we have been selling the 7-PDF Printer for many years and many customers already have a license for the 7-PDF Printer and do not need the option to process control characters.
This means that you need to purchase a separate license for the plugin if you need to process control characters, in addition to a license for the 7-PDF Printer. As a system requirement, we need at least a Professional license for the 7-PDF Printer. If both licenses are available, then the PDF documents generated with the plugin will no longer receive a red "PLEASE REGISTER" watermark text and all control codes will be removed from the PDF.
The licenses you purchase from us are one-time license costs (excluding maintenance contract costs), meaning we do not have subscription or cloud compulsion. You can find the prices and the buy button for both software products here....
Registration of the license key in the application
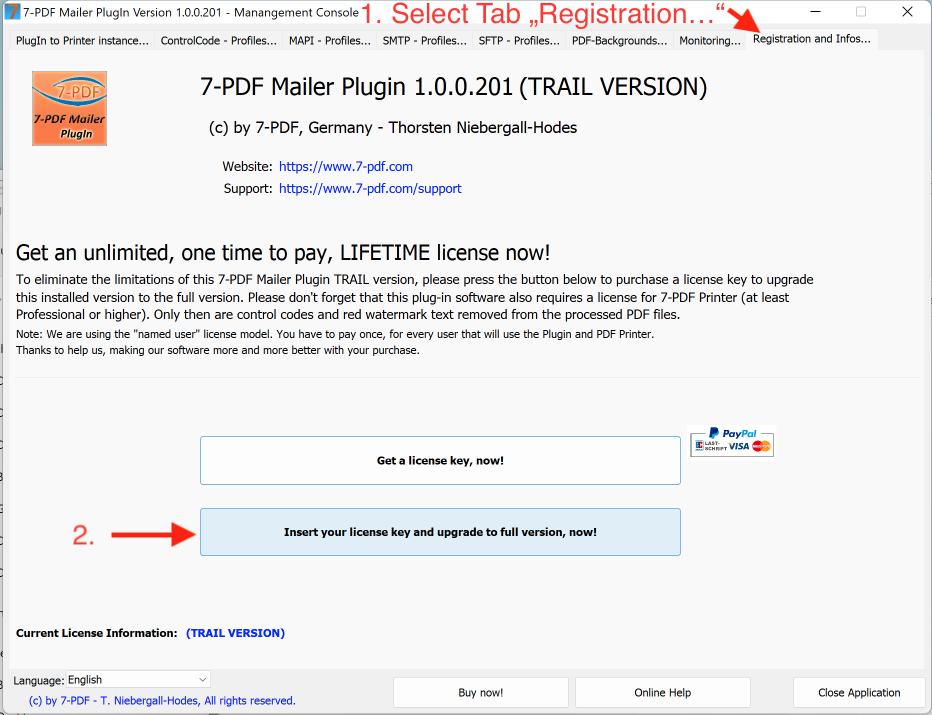
After purchasing the license, your personal license key can be activated as a full version in the already installed plug-in directly using the "Enter license key, ..." button in the tab/basic tab "Registration and information...". To illustrate this, the following graphic shows the "Enter license key..." button within the software:
Notice: When the license key is captured, it is validated and activated via the Internet (via SSL). Therefore, make sure you have an active internet connection for the one-time registration process of the application! In rare cases, locally installed third-party application firewalls may block the program from accessing the Internet. When using such third-party firewalls, make sure to grant the application the necessary rights to access the Internet for the one-time registration process.
Unfortunately, the issue of software piracy is also harmful to us and we must counteract this piracy. This is the only way we can continue to provide you with maintenance or support services free of charge. The internet is only necessary for the registration process! What is stored on your systems stays on your systems!
Automatic license distribution with the 7-PDF Mailer PlugIn full version
In addition to manual entry in the installed plug-in, licensing can also be done automatically in the context of a deployment. For this you set a corresponding registry entry.
The screenshot below shows the path to capture the license key within the registry.
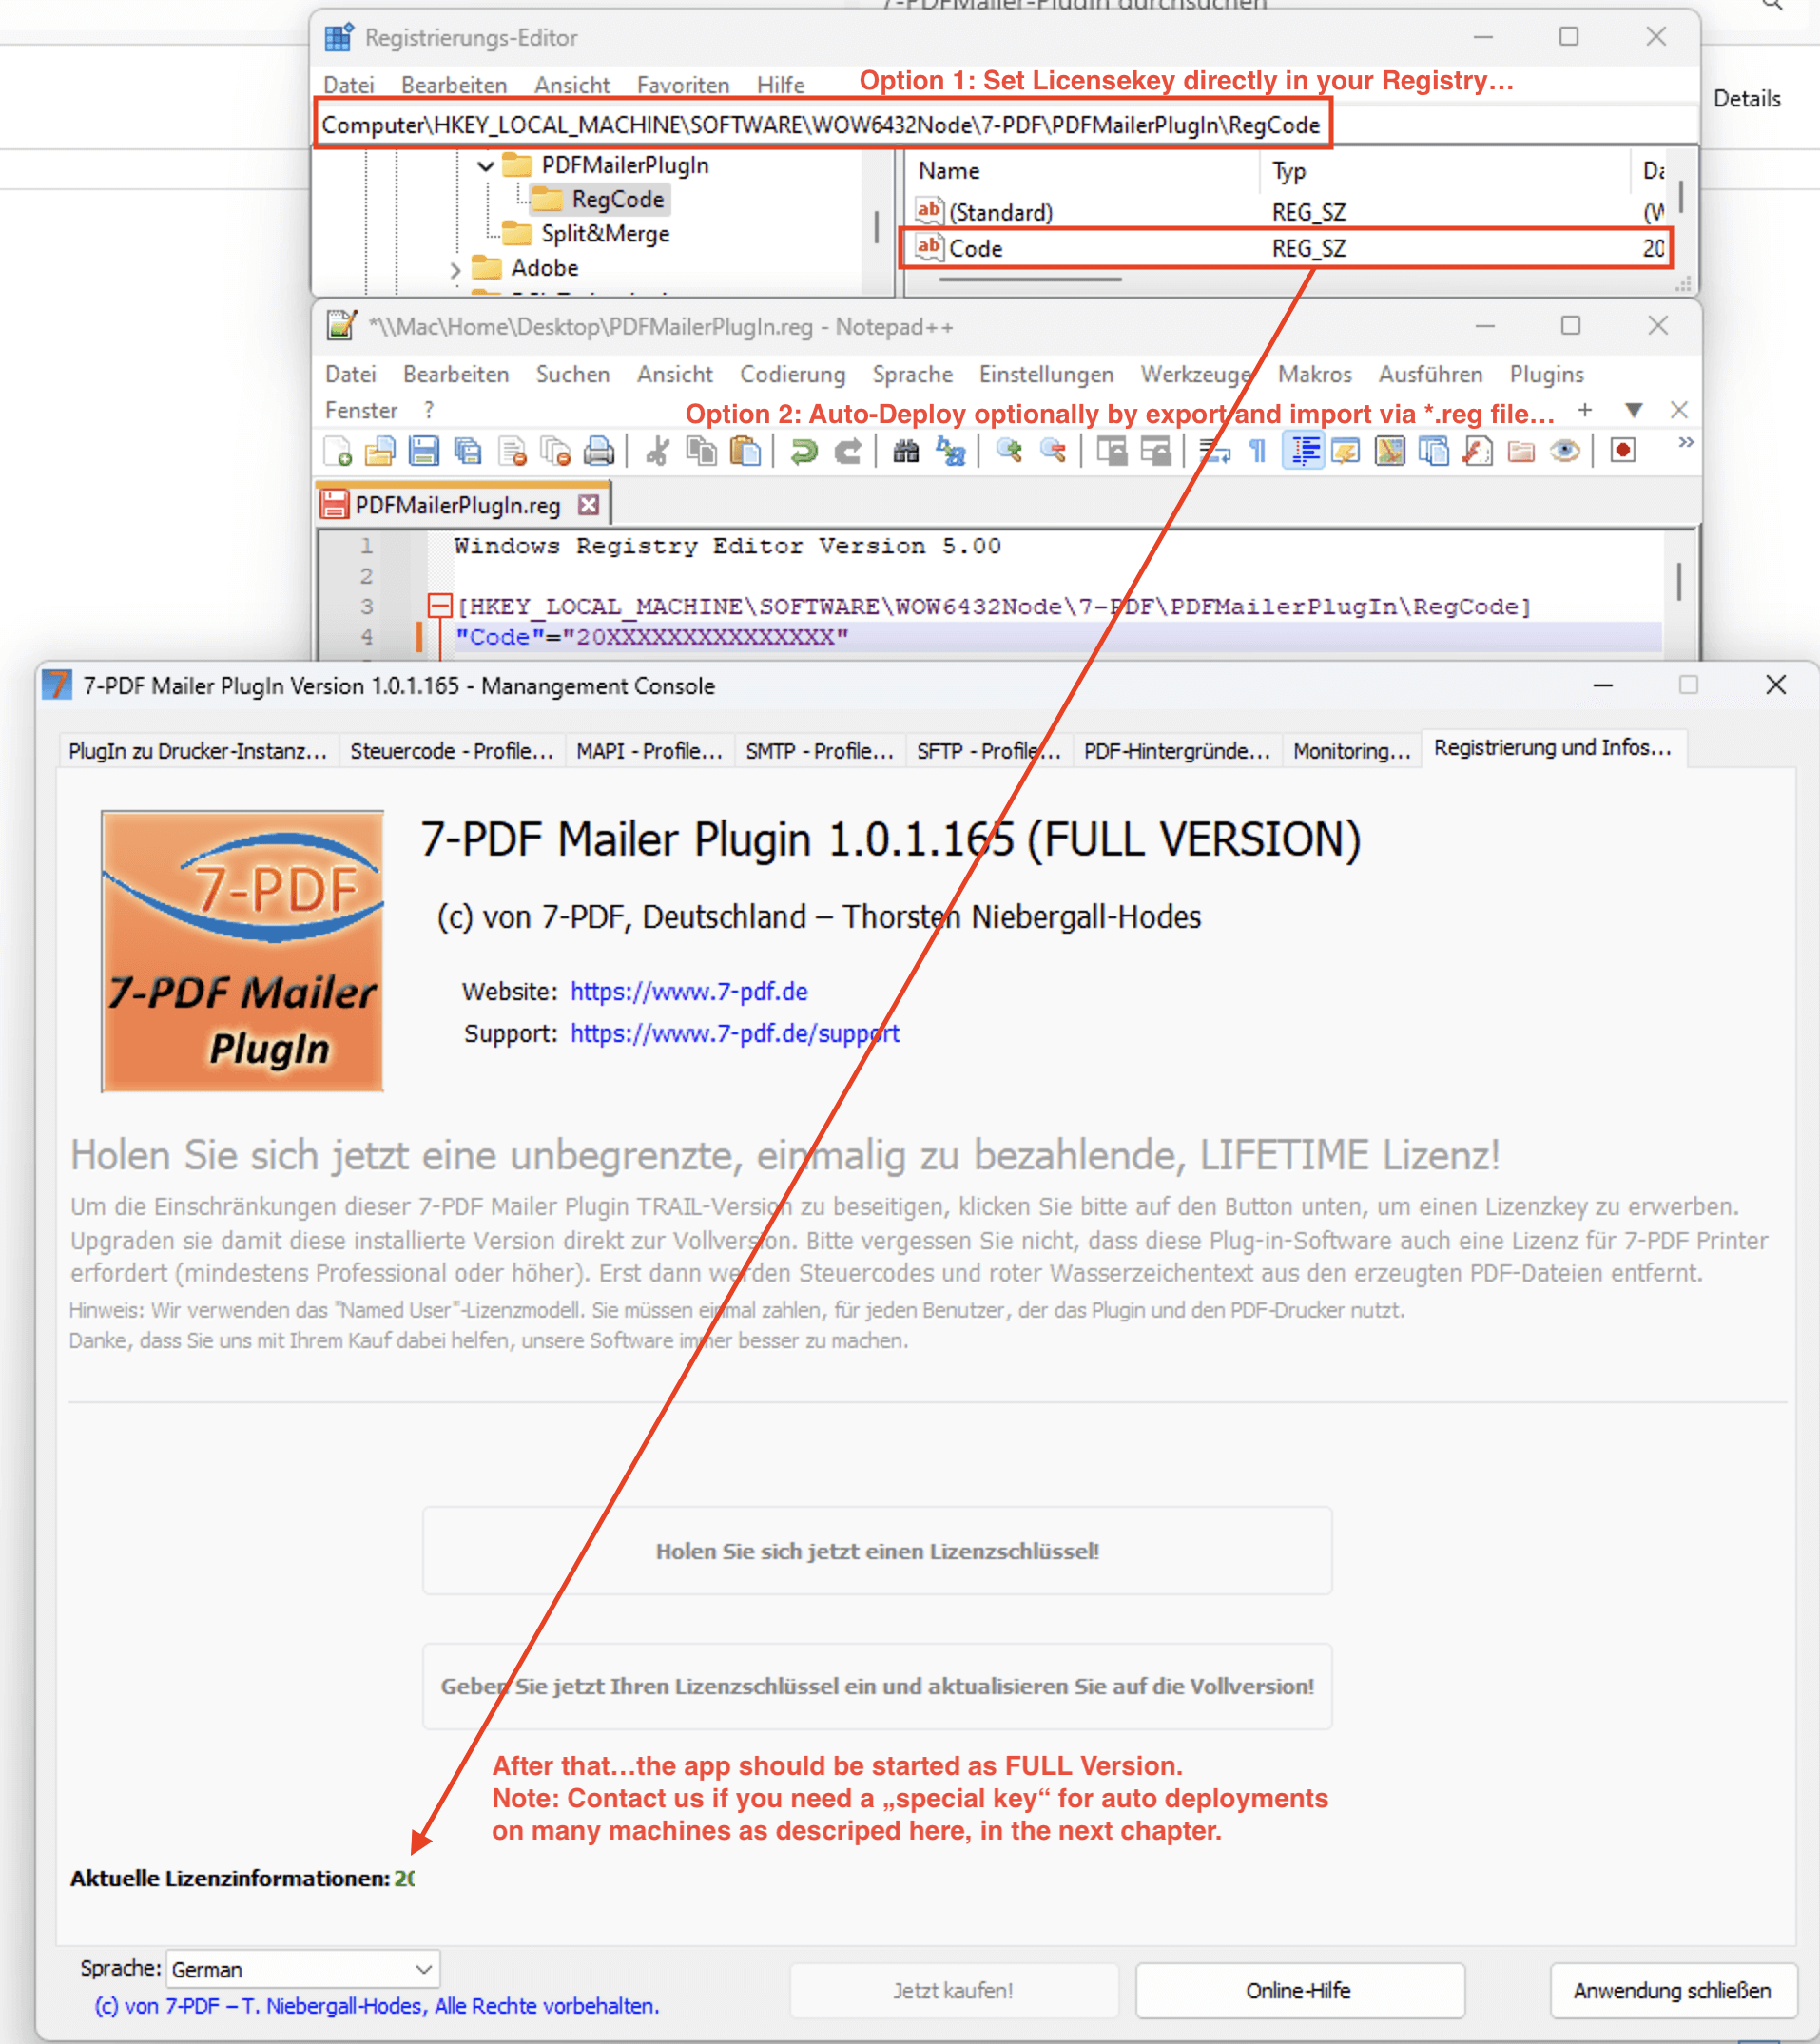
By setting the license key in the “Code” key, the software then starts as a full version.
For licensing as part of a deployment on many PCs at the same time, please contact us. This requires a special key (SPECIAL KEY) which you can distribute directly, either via an INI file or, better, via a registry entry.
Under Citrix and TS systems, on the other hand, it is usually sufficient to start the application with “Run as administrator” and manually enter the license key you purchased as an admin in the application for licensing. In this scenario, the registry key shown in the figure above is set by the application itself. However, this step must be carried out manually for each terminal server individually. If you have a large number of terminal servers, we recommend contacting us about this as well. As with deployment on many PCs at the same time, this scenario also requires a special key that you can distribute directly and automatically.
Automatic deployment / software distribution
To distribute the software, the setup supports the installation parameters /SILENT and /VERYSILENT.
If you have any further questions about the plug-in, please contact our free email support directly. Otherwise, we hope you enjoy using the 7-PDF Mailer PlugIn!
Control Characters - Documentation
The control characters described here, along with their purpose, syntax, and usage, are explained using the "Preset1" control character profile available in the default state. The delimiter in this control character profile is defined as @@. You can always create your own control character profiles, provided they start with at least two and at most three unique letters.
Control characters always consist of three separate areas: the control character itself, parameters and data, and the ending or delimiter. Example: @@XYVALUE OR PARAMS@@
1. Purpose -> Mailing...
Control Character 1.1: @@mlVALUE@@
...is the control character for generating an email. This control character is activated by default. If the control character is explicitly set to 0, no mail dispatch will occur, not even via SMTP. The control character may only appear once within a print job.
Possible Values:
0 = Deactivate
1 = Activate (default)
Control Character 1.2: @@moVALUE@@
...is the control character for opening the user's default mail client. It is set by default, allowing the user to manually click the Send button of the used mail client before sending. If the control character is explicitly set to 0, an automatic dispatch via the user's mail client occurs. The control character may only appear once within a print job.
Possible Values:
0 = Deactivate
1 = Activate (default)
In the mail merge process, logically, the opening of the standard mail client is automatically deactivated by the plugin.
Attention: If dispatch via SMTP is defined (@@spVALUE@@ control character present in the print job), an automatic dispatch occurs even if @@mo1@@ is set. With SMTP, the control character is thus ignored, which is usually the case in installations as a PDF network printer, as we do not want email windows or open mail clients.
Control Character 1.3: @@spVALUE@@
...is the control character for sending via SMTP profile. The control character may only appear once within a print job.
Possible Values:
Value = Name of the SMTP profile (Attention: Please create it beforehand via the 7-PDF Mailer Plugin - Management Console -> Tab "SMTP - Profiles...")
Example: @@spcontact@7-pdf.de@@
Note: If no such control character is defined in the print job and @@ml1 is set, the local mail client is used for sending or generating an email.
Control Character 1.4: @@toVALUE@@
...is the control character for setting the TO - email recipient (main recipient). The control character may only appear once within a print job. Multiple email recipients can be passed separated by a semicolon.
Possible Values:
Value(s) = Email address(es) of the recipient(s).
Example 1: @@tocontact@7-pdf.de@@
Example 2: @@tocontact@7-pdf.de;invoice@7-pdf.de,... @@
Control Character 1.5: @@ccVALUE@@
...is the control character for setting the CC - email recipient (carbon copy recipient). The control character may only appear once within a print job. Multiple email recipients can be passed separated by a semicolon.
Possible Values:
Value(s) = Email address(es) of the recipient(s).
Example 1: @@cccontact@7-pdf.de@@
Example 2: @@cccustomers@7-pdf.de;newsletter@7-pdf.de,... @@
Control Character 1.6: @@bcVALUE@@
...is the control character for setting the BCC email recipient (blind copy recipient). The control character may only appear once within a print job. Multiple email recipients can be passed separately with a semicolon.
Possible Values:
Value(s) = Email address(es) of the recipient(s).
Example 1: @@bccontact@7-pdf.de@@
Example 2: @@bccustomers@7-pdf.de;newsletter@7-pdf.de,... @@
Tip: The control character can be used wonderfully to have emails that are sent via the PDF Mailer transferred to the "Sent" directory (SEND FOLDER) of your email server. To do this, you extend the email subject line (control code @@ed) with a unique text block such as "[!MAILER!]", search for incoming emails using a global email server rule and use this rule to move them to the sender's "Sent" directory! Your recipients won't notice anything when you use the control character - BCC (blind copy).
Control Character 1.7: @@edVALUE@@
...is the control character for setting the email subject text (Subject). The control character may only appear once within a print job.
Possible Values:
Value = Free text
Example: @@edYour Invoice Mrs. XY@@
Control Character 1.8: @@saVALUE@@
...is the control character for setting the email body text. The control character can appear multiple times and for each control character, a new line is created.
Possible Values:
Value = Free text (HTML possible)
Examples:
@@saDear Mrs. XY,@@
@@sain the attachment, you will find your invoice dated 21.10.2020.@@
@@sa@@
@@Yours sincerely@@
@@Your Company XY@@
Control Character 1.9: @@mbVALUE@@
...is the control character for retrieving an email body text from an existing text file (*.txt). For example, the control character is suitable for adding a fixed email signature or fixed paragraphs of text without having to loop everything through @@sa into the email body text. The control character may appear multiple times within a print job.
Possible Values:
Value = Absolute file path to a text file.
Example:
@@mbC:\Temp\body.txt@@
@@mbC:\Temp\signatureXY.txt@@
The control character is replaced with the text from the specified file, i.e. at the position where it was inserted in the mail body (see control character @@sa).
Note: If you use the MAPI interface with our PDF Mailer PlugIn to send emails, the Outlook email signature will be missing from emails. Unfortunately, Microsoft has denied the MAPI interface this functionality. See this Microsoft entry. However, you can use the control character @@mb to insert a signature (HTML is also supported). If, however, you send your emails via Exchange SMTP instead of using MAPI, signatures are added to outgoing emails from the Exchange Server itself as usual (via rule definition).
Control Character 1.10: @@maVALUE@@
...is the control character for attaching additional documents to the email being created. The control character can appear multiple times.
Possible Values:
Value = Absolute file path to a file.
Examples:
@@maC:\Temp\EULA.pdf@@
@@maC:\Temp\UserManual.docx@@
Control Character 1.11: @@mfVALUE@@
...is the control character for setting an explicit or different filename from the storage name, of the PDF file being printed in the email being created. The control character may only appear once within a print job.
Possible Values:
Value = Desired filename
Example: @@mfLM23459.pdf@@ or @@mfOffer2020-006@@
Note: The control character should be used in combination with the control character @@sf mentioned further below. Alternatively, @@fn can be used for "both" purposes (mailing + saving), then @@sf (save) and @@mf (mail) should not be defined.
Control Character 1.12: @@bfVALUE@@
...is the control character for setting a default directory for email attachments. Then you no longer need to specify the absolute directory path for each file when using @@ma. The control character may only appear once within a print job.
Possible Values:
Value = Absolute file path
Example: @@bfC:\Documents\Attachments@@
Example: @@maTerms.pdf@@ (from C:\Documents\Attachments)
Control Character 1.13: @@mpVALUE@@
...is the control character for setting the email dispatch priority. The control character may only appear once within a print job.
Possible Values:
0 = Low
1 = Normal (default)
2 = High
Control Character 1.14: @@md@@
...is the control character for removing the printed PDF as an attachment from the email being created. For example, the originally printed PDF via the 7-PDF Printer instance is then no longer present in the email. The control character may only appear once within a print job.
Example:@@md@@2. Purpose -> Saving...
Control Character 2.1: @@svVALUE@@
...is the control character for saving or not saving the printed PDF. The control character may only appear once within a print job.
Possible Values:
0 = Saving disabled (default)
1 = Saving enabled
Control Character 2.2: @@fnVALUE@@
...is the control character for setting the filename of the generated PDF document (Priority, for mailing and storage purposes). The control character may only appear once within a print job.
Possible Values:
Value = Desired filename
Example: @@fnLM23459.pdf@@ or @@fnOffer2020-006@@
Control Character 2.3: @@sfVALUE@@
...is the control character for setting an explicit PDF filename for the purpose of storage (can differ from the attached PDF filename, see also @@mf). The control character may only appear once within a print job.
Possible Values:
Value = Desired filename
Example: @@sfLM23459_CustomerNumber_22104.pdf@@ or @@sfLM23459_CustomerNumber_22104@@
Control Character 2.4: @@seVALUE@@
...is the control character for "canceling", "overwriting", or "incrementing" a PDF filename. The control character may only appear once within a print job.
Possible Values:
0 = Cancel saving
1 = File will be overwritten if it exists
2 = File name will be incremented (default)
Example: LM23459(1).pdf, etc.
Control Character 2.5: @@dfVALUE@@
...is the control character for specifying the directory path where the PDF to be printed should be saved. The control character may appear multiple times within a print job. The PDF to be printed is then saved in each specified path. Directories that do not exist are created automatically. The control character requires that you have previously set @@sv1@@.
Possible Values:
Value = Desired directory path
Example 1: @@dfC:\Documents\PDFs\
Example 2: @@\\Server01\Documents\PDFs\
Note: Directories that do not yet exist will be automatically created!
Control Character 2.6: @@ofVALUE@@
...is the control character for selecting the output format of the printed PDF pages. The control character may only appear once within a print job.
Possible Values:
0 = PDF format (one file as PDF, default)
1 = JPG/JPEG format (each page as a JPEG file)
2 = MultiTIFF format (one file as TIFF)
Note: The control character requires that you have also previously set@@sv1@@. If the control character for specifying a storage path@@dfoccurs several times in a print job, the PDF pages to be printed in the selected output format will be saved there several times in each specified storage path.
Control Character 2.7: @@afVALUE@@
...is the control character for appending additional existing PDF files to the printed PDF. The pages of these PDF files are appended to the printed PDF in the order in which this control character appears. It can therefore occur multiple times.
Possible Values:
Value = Desired additional PDF pages from a PDF file (absolute file path)
Example:
@@afC:\Attach\Append1.pdf
@@afC:\Attach\Append2.pdf
@@afC:\AutoAttach\*.pdf (with wildcard)
...
Note: A directory path with a wildcard *.pdf can also be used. This will autom. attach all existing pdf files in the directory path to the printed pdf.Important extension for ScanPDFs and processing by print dispatch centers
For "pure" ScanPDFs that consist exclusively of scanned images (each page only consists of one image), the control character @@af now offers the option of adding a fixed left margin. This feature is particularly useful for processing documents through print mailing centers.
To add a left margin for ScanPDFs (coming from a scanner and containing only a "photo" of a scanned physical page), use the ScanMargin parameter in the @@af control character.
Syntax:
@@afScanMargin=12|\\Path\To\ScanPDF.pdf@@
ScanMargin=12| sets a left margin, here of 12 mm. You can adjust this value to change the width of the border. The parameter must be ended with a pipe!Using the "LeftWhiteMargin" parameters:
To force a left margin for normal PDF files (not ScanPDF), use the LeftWhiteMargin parameter in the control character @@af.
Syntax:
@@afLeftWhiteMargin=12|\\Path\To\NormalPDF.pdf@@
LeftWhiteMargin=12| sets a left margin of 12 mm for a normal PDF (not a scan PDF). You can adjust this value to change the width of the border. The parameter must be ended with a pipe!Automatic optimization when using the "ScanMargin" and "LeftWhiteMargin" parameters:
- The plugin automatically draws a left margin in the attached PDF if ScanMargin is set for scan PDF files or LeftWhiteMargin for normal PDF files.
- The scanned image or the PDF page of a normal PDF is repositioned proportionally and optimized in its image size.
- The paper size depends on the size of the first page in the relevant PDF. This means that the attached PDF pages are automatically scaled to a paper format that comes closest to the page format of the first page of the PDF document in question (usually DIN A4).
Print centers often print "letter IDs" on the left margins. The e-mail process therefore provides for a blocking area of at least 12mm on the left edge. If there is something on the edge (e.g. image shadows due to a poor scan result), the e-mail print dispatch will be canceled because the blocking area is violated. The printing center will then not accept such PDFs and sending them as a letter will be impossible. Therefore, the 7-PDF Mailer plugin optimizes these PDF files fully automatically when the “ScanMargin” or “LeftWhiteMargin” parameter is used. You should first test whether 12 mm is sufficient for them using your special printing center.
3. Purpose -> Options...
Control Character 3.1: @@sdVALUE@@
...is the control character for displaying the PDF with the standard PDF viewer after saving. The control character may only appear once within a print job.
Possible Values:
0 = PDF is not opened and displayed (default)
1 = PDF is displayed with the default PDF viewer
Attention: In PDF network printer installations and in MailMerge mode, this value is ignored, as we do not want a PDF preview here.
Control Character 3.2: @@bpVALUE@@
...is the control character for inserting a PDF background (PDF letterhead). The control character may only appear once within a print job.
Possible Values:
Value = Desired PDF background name
Example: @@bpBG_1@@
Note: If only @@bp@@ is defined, the PDF background set as the default background is inserted. Otherwise, no background is inserted.
If you wish to use multiple PDF backgrounds for your print scenario, you can use the syntax for "Scenarios of PDF Background Implementation" of the 7-PDF Printer to achieve this! For example, it is possible to define different backgrounds for page 1 and the following pages, and much more.
A small example: You have saved BG_1 and BG_2 as PDF backgrounds in the management console of the plugin. Now we want BG_1 for the first page, and BG_2 for the following pages in all dispatches. Then we define the control character in the context of the control code profile "Preset1" as follows:
@@bpBG_1<F1>BG_2<F2->@@
There are even more very flexible ways to control backgrounds. It is worth delving into this topic via the above link! 7-PDF Printer is very flexible here.
Attention: Please create it beforehand via the 7-PDF Mailer Plugin - Management Console -> Tab "PDF - Backgrounds..."!
Control Character 3.3: @@pfVALUE@@
...is the control character for forwarding the printed PDF to another (physical) printer. The control character may only appear once within a print job.
Possible Values:
Value = Printer name
Example: @@pfBrother MFC-J6945DW Printer@@
Note: Would print the PDF on the Brother printer. Please note that with @@bs there is an option to remove an inserted PDF letterhead from the print forwarding, if desired.
Control Character 3.4: @@nd@@ - MailMerge Mode
Is the control character for activating the mail merge process (MailMerge). That is, the 7-PDF Mailer Plugin will start a new document after each page containing the control character and process the control characters placed within this split job separately. The control character can, of course, appear multiple times within a collective job.
This behavior is known from the mail merge process in Microsoft Word. Imagine a mail merge from Word, with control characters like @@to and different email recipients on each individual job. You send the entire mail merge directly to the 7-PDF Printer instance and let the plugin process it. Each individual job in this mail merge starts with the control character @@nd@@. This tells the plugin where to "split" the print jobs and process them separately!
Possible Values:
Value = No value
Example: @@nd@@ must always be placed on the page where a new individual job begins.
Important: The tax symbol must always be on the first page of a "new" individual order!
Control Character 3.5: @@ipVALUE@@
...is the control character for inserting one or more graphics. This means you can insert a graphic at any place in the document. BMP, JPG, and PNG files are supported. The control character also supports the generation of dynamically created QR code graphics (see below). The control character can appear multiple times within a print job.
Possible Values:
1st Option: Width*Height*Path\Filename<
2nd Option: X*Y*Width*Height*Path\Filename<
The * character serves as the delimiter. The height and width specifications are to be fixed in millimeters (mm).
Explanation for Option 1: The image is placed at the position in the document where the control character appears, according to the width and height specifications. If one of the values for width or height is 0, the graphic is automatically proportionally scaled in width or height and integrated into the document.
Explanation for Option 2: In addition to parameter specifications such as width, height, and absolute file path, exact specifications for the X/Y coordinate can also be made. Here the graphic is placed exactly there in the document. X and Y are given in millimeters (mm).
As the last character after the graphic file path, an optional less-than sign can be set. This puts the graphic in the background (<)
Examples: @@ip45*0*\\Server1\Desktop\paid.png@@
A graphic paid.png is integrated from the UNC path \\Server1\Desktop\paid.png, with the width set to 45mm, the height is proportionally scaled. An X/Y placement is missing, so the graphic is placed in the document at the position where the control character stands. Since no less-than sign is specified as the last character, the image is rendered in the foreground.
Inserting a QR code graphic dynamically with @@ip
Example with QR code: @@ip60*60*QRCODE=https://www.7-pdf.de?id=«OfferName»@@
A QR code graphic is generated at the size of 60x60mm in width and height at the position in the document where the control character was placed. The URL of the QR code points to: https://www.7-pdf.de?id=«OfferName» and a mail merge field from Microsoft Word. That is, the "id" of the URL parameter is dynamically integrated from the data value «OfferName».
Control Character 3.6: @@rpc@@
...is the control character that removes the page of the printed PDF on which it was placed. It can occur multiple times. Control characters placed on the page to be deleted are taken into account during the processing of the print job.
Example: @@rpc@@
Tip: The control character is very suitable for placing all control characters on one page of the print job (for example on the last page) and then deleting them with @@rpc@@.
Control Character 3.7: @@diVALUE@@
...is the control character for setting PDF information like PDF subject, PDF author, PDF title, PDF keywords. The control character can appear multiple times within a print job.
Possible Parameters and Values:
aVALUE = PDF Author
tVALUE = PDF Subject
sVALUE = PDF Title
kVALUE = PDF Keywords
Example: @@diaAuthorName@@
Example: @@ditASubject@@
Example: @@disATitle@@
Example: @@dikKeywords,Keywords,Keywords,Keywords@@
Control Character 3.8: @@efVALUE@@
...is the control character for embedding files directly into the PDF (PDF attachments). The control character can therefore appear multiple times within a print job.
Possible Values:
Value = Desired absolute file path to the document to be inserted into the PDF.
Example:
@@efC:\Embedding\Documentation.docx
@@efC:\Embedding\Calculation.xlsx
...
Control Character 3.9: @@bsVALUE@@
...is the control character for removing the PDF background(s) from the PDF before it is forwarded to a printer using @@pf (see 3.3). The control character may only appear once within a print job.
Possible Values:
0 = Background is not removed (default)
1 = Background is removed
Example:
@@bs1
Control Character 3.10: @@caVALUE@@
...is the control character for activating or deactivating PDF/A generation (PDF long-term archiving). The control character may only appear once within a print job.
Possible Values:
0 = No PDF/A creation (default)
1 = PDF/A-1b creation activated
Example:
@@ca1
Note: If @@ef is used, a PDF/A3-b creation is carried out to comply with the PDF/A specification.
4. Purpose -> PDF Security...
Control Character 4.1: @@suVALUE@@
...is the control character for setting the open password for the PDF. The open password is so named because it is requested immediately upon opening the PDF document by the PDF viewer, such as Acrobat Reader. Only by entering the correct password can the user read, print, etc. the PDF. The control character may only appear once within a print job.
Possible Values:
Value = Desired "open password"
Example: @@suGshB!65rWs
Control Character 4.2: @@soVALUE@@
...is the control character for setting the OWNER password for the PDF. The OWNER password is so named because it is required when setting PDF security settings. Only the owner of the PDF can set these settings. The PDF can usually be opened and read with Acrobat Reader. Combined with PDF security settings, however, access can be restricted. For example, printing may not be allowed, or extracting content, etc. The control character may only appear once within a print job.
Possible Values:
Value = Desired "owner password"
Example: @@soVgFSx!hJrW2
Control Character 4.3: @@srVALUE@@
...is the control character for setting PDF security settings. The control character may only appear once within a print job. The parameters for setting PDF security can be combined in any way, but must be written in UPPERCASE.
Possible Values:
P = Allow printing
S = Allow selecting and copying of PDF content
C = Allow changes to the document
A = Allow adding and modifying PDF form fields
Example: @@srPA -> Allows printing and adding/modifying form fields.
If @@sr and @@so are present, the PDF document is completely restricted in access rights, and only by specifying or combining the available parameters (PSCA) are contents, printing, etc. gradually "opened" and made accessible. Attention: If @@sr and @@su are present in a print job but no password is set, a random password (!) is automatically generated by the plugin. If @@sr is not present, but @@su and @@so are present in the current print job, the PDF is completely restricted in access.
If all three security control characters are missing, the PDF is completely unprotected (default).
5. Purpose -> (S)FTP Upload...
Control Character 5.1: @@fsVALUE@@
...is the control character for uploading via SFTP. The control character may only appear once within a print job.
Possible Values:
Value = Name of the SFTP profile (Attention: Please create it beforehand via the 7-PDF Mailer Plugin - Management Console -> Tab "SFTP - Profiles...")
Example: @@fs7-pdf.de@@
Control Character 5.2: @@ffVALUE@@
...is the control character for setting the remote storage path on the SFTP server for the PDF. The control character may only appear once within a print job.
Possible Values:
Value = absolute remote path, must start with /
Example: @@ff/var/www/upload/@@
Important: The remote path specified in the SFTP profile and the path provided here must be in the same root directory or below. If the remote path is incorrect or not present, the fallback remote path of the previously defined SFTP connection is used.
Control Character 5.3: @@feVALUE@@
...is the control character for "canceling", "overwriting", or "incrementing" during the save process of a PDF document via SFTP upload. The control character may only appear once within a print job.
Possible Values:
0 = Cancel saving
1 = File will be overwritten if it exists on the SFTP server
2 = File name will be incremented if it exists on the SFTP server (default)
Example: LM23459(1).pdf, etc.
You are always welcome to contact us if you need help.

